Wednesday, December 31, 2008

Guitar Gear for Beginners - Part 8 - Pitch Effects

There are a couple of effects that will effect the pitch of your instrument. 

Octaver

The octave pedal does what it's name says, it shifts the pitch of your instrument by octaves. Some have options as to what octave you want to add. One octave up, one down, 2 down, etc. Then levels of how much original signal and shifted signal to have. The Boss OC-3 Super Octave is an example of a octave pedal.

Pitch Shifter

The pitch shifter is a much more complex unit. There are some pitch shifters that do the same thing as an octave pedal except with other pitches, like a 5th or a 4th. The new generation of pitch shifters let you tell the pedal what key you are playing in and then it can tell if you are doing say 3rd harmonies, if it should be a minor 3rd or a major third, so that your harmony notes are in the right key. The Boss PS-5 Super Shifter and the DigiTech HarmonyMan are examples of this type of pedal. 

What do I Use?

Right now I don't have either of these types of pedals on my pedalboard. They are just not what I need at the moment.

Do you use an octave or pitch shifting pedal that I have not mentioned? Let us know in the comments.

Tuesday, December 30, 2008

Guitar Gear for Beginners - Part 7 - Time Effects

Time based effects are those that elongate, or repeat our sounds.  Here are 3 types of effects that fall into this category.

Delay

Delay is an echo effect. Depending on the unit we are using, we will set a delay time (how fast does it echo) and a regeneration factor (how quickly does it get quieter with each echo) and a count of how many echos we want. Some examples of delay effects are the Boss DD-3 which is a pretty simple delay pedal, or the Boss DD-7 which is the same pedal as the DD-3 but has a few more delay styles as well as the option for an external 'tap tempo' which will allow you to set your delay speed by clicking a separate pedal. One Delay pedal that I have not had the opportunity to play, but have heard great things about is the Line 6 DL4. This unit has 3 programmable presets (so you don't have to tweak settings while you are playing) and a dedicated tap tempo button.

Reverb

Reverb is an effect that lets a sound trail off as if it were in a room where the echo time was very short. Or as Wikipedia puts it "Reverbration, or "reverb", is the persistence of sound in a particular space after the original sound is removed. "  A lot of amps have an reverb unit built in. If you have ever moved an amp and gotten a loud sound come out of it that sounded like giant springs, that would be the spring reverb unit in the amp. There are some pedal based reverb units as well if you want more control of your reverb sounds. The Boss RV-5 is one example or the Line 6 Verbzilla which has 11 different types of reverb built it.

Looping

Loopers are a similar idea to delay except that they let you store more than 1 "sample" and then layer them on top of one another.  One major difference between a delay pedal and a looper is that most delay pedals will only let you take a sample of up to maybe 2 seconds, where a looper will provide much longer samples. Here is an example of a guy playing with a looper. Boss make a looper in simple pedal, the Boss RC-2 Loop Station as well as a more complex and larger unit, the Boss RC-20XL Loop Station, Line 6 and Digitech also have offerings in this area as well.

What do I use?

Personally, I use the built in reverb in my Crate V33-212 amp and a Boss DD-6 which from what I can tell has been discontinued in favor of the DD-7. One of these days I need to get my hands on a looper, but it is not really high on my priorities list right now. 

So what time based effects do you use? Sound off in the comments section. 

Monday, December 29, 2008

Guitar Gear for Beginners - Part 6 - Modulation Effects

PhaserFlanger, Chorus are several of the more popular modulation effects.  The difference between them can be a little difficult to explain, but I'll give it a go. 

Chorus

Chorus works by playing a copy of the sound coming in again just slightly later than the original (like 100ms later) and lightly altering it's pitch. This makes it sound like 2 or more instruments are playing the same thing at the same time, a chorus of instruments if you will. The Boss CH-1 is a nice simple chorus pedal.

Flanger

A flanger works very much like a chorus, except that the delay is much shorter and a portion of the delayed signal is fed back into the delay. This creates a swooshing sound. The term flange actually comes from when in the reel to reel studio days they would have 2 synced up tape machines and press their finger on the 'flange' of the tape reel, slowing it down a little and the combined sound would give the same effect. This MXR Flanger pedal seems to be pretty popular although I have not played it myself.

Phaser

A phaser although it has a similar sound to a flanger works in a different way. The sound rather than being delayed has it's phase shifted and added back to itself based on a filter. This phase shifting creates the phaser sound


What Do I Use?

Right now the only one of these 3 pedals that I use is a Boss CH-1 Chorus pedal. I personally have never been a huge fan of flange/phase effects so I have not spent any money on them. But that is just a personal preference as there is certainly nothing 'wrong' with those effects. They can be used very nicely, but please, use in moderation :)

Do you have a modulation effect that you love? If so sound off below and let us all know what you have discovered!


Sunday, December 28, 2008

Guitar Gear for Beginners - Part 5 - Volume Effects

Compressor

The compressor is a tough effect to explain if you have not worked it it before.  The basic idea is this: As you play louder, it turns you down. So that way you can turn up the quiet stuff without blowing out the doors with the loud stuff. Depending on how fast your effect is set, it can create a very "punchy" tone due to the compressor kicking in. The MXR Dyna Comp is a popular compressor  as well as the Boss CS-3.

Tremolo

Tremolo is a volume effect were the volume is turned up and down within a set range at a set tempo. This effect is very popular in 'surf music' The Boss TR-2 or the Voodoo Lab Tremolo are example pedals. Generally the speed and depth are set with knobs on the unit. Some pedals have a "tap" feature, allowing the speed to be setting by tapping your foot on the unit.
 
Volume Pedal

A volume pedal is a rocking pedal that takes it's incoming signal and turns it down based on how far forward or back it is set. The Visual Visual Volume Pedal or the Boss FV-500H are good examples. 

What do I Use?

I have an old version of the Boss volume pedal on my pedal board. It is over 15 years old and still works great (another reason I love boss). I use the MXR Dyna Comp pedal and am currently in the market for a good tremolo pedal. 

If you have favorite pedal in these categories that I have not mentioned, let everyone know by commenting below!

Saturday, December 27, 2008

Guitar Gear for Beginners - Part 4 - Filter Effects

Filter effects are basically effects that take your sounds and either cut or boost certain frequecies. 

Equalizer

An EQ pedal does the exact same thing the EQ on a stereo does. It lets you pick a frequency and cut or boost it. Having it in a pedal means you can turn it on or off at a whim and it is within your reach if you need to make a change. The MXR M-108 or the Boss GE-7 are examples of EQ pedals.

Wah

Wah is basically an eq pedal with a small group of frequencies boosted and the others cut, then when you rock your foot on the pedal, it select what that range of frequencies is set at. A talented wah player can get very creative tones from a pedal.  There is also a series of pedals that simulate a wah effect based on how hard you play, these are called auto-wah or envelope filters. The Dunlop Crybaby is probably the most classic wah pedal.

What Do I use?

Well right now, I do not have an EQ or Wah pedal in my rig.


Got a favorite wah pedal? How about a great EQ pedal you use? Post a comment below!

Friday, December 26, 2008

Guitar Gear for Beginners - Part 3 - Distortion Effects

It seems like at the beginning of every gear based email that I write, I start with a disclaimer that xyz is a little complicated, and effects are no different. One of the things that makes effects such a wide subject is that there are so many different types that do drastically different things. 

There are really 2 ways to acquire effects (that can be combined), first is the "Stomp Box", the classic effect pedal and second is multi-effects, which can either be pedal based or rack based. We will first take a look at the various types of effects. With each effect, I'll mention a pedal version. If you are interested rather in multi-effects we will get to that later on.

Distortion Effects

Gain effects are any in a wide variety that effect the overall strength of the signal. The main type of effect in this group is distortion. When you increase the gain past the amount the circuit is designed to handle, it 'clips' this clipping is what causes the distorted sound we are so used to. When you are just on the edge of distortion, it is called overdrive which is very light clipping, adds a bit of 'dirt' to the sound. Usually only on louder notes or chords. Distortion is when your signal is always clipping, the level of distortion is based on how hard it is being pushed. There are dozens of pedals that can give you distortion. One of the classics is the Boss DS-1 this pedal will give you a reasonable range of distortions, although having a DS-1 modded by Keeley Electronics this upgrade takes your $40 Boss pedal and really adds some fullness to it. See this Youtube video for a comparison.  By the end of this series you will probably think I am a shill for Boss, but I have always liked their stuff and I have a bunch of it myself, it is built pretty tough. That being said, The Boss BD-2 is another great pedal. This overdrive pedal when set right can give your guitar that little bit of dirt that really makes it stand out. The Ibanez TS808 is another classic distortion pedal. If you are in to much heavier tones, you also might want to check out the Boss ML-2 Metal Core or the Boss MT-2 Metal Zone which give "high gain" style distortion found in the various forms of metal music.

One last type of distortion worth mentioning is Fuzz. As wikipedia puts it 

"Fuzz was originally intended to recreate the classic 1960's tone of an overdriven tube amp combined with torn speaker cones." 
It has a unique and cool sound. The Dunlop Jimi Hendrix Fuzzface is an example of a popular fuzz pedal.

What do I use?

At the time of this post, I own a DS-1 and a BD-2 for distortion. This gives me a decent range of distortion sounds. Although I do not play straight ahead metal, I am looking at the ML-2 for those times when I need that something extra. I do not currently have a fuzz pedal in my rig. 

There are so many talented folks out there with their own personal favorite, so for any players out there who may be reading this, What is your favorite distortion pedal and why? Chime in below in the comments. 

Wednesday, December 24, 2008

Christmas in IT

How do a group of a dozen IT people celebrate Christmas? With a day of food (really good food) and video games, namely Rock Band. If you have never heard your boss sing Alanis Morriset's "You Oughta Know" you haven't lived...or at least laughed really hard. Thanks Paul!


Guitar Gear for Beginners - Part 2 - The Amp

Nothing strikes fear into the guitar students parent when they realize that little Timmy is gonna need an amplifier to go along with that electric guitar. They have visions of the first scene in "Back to the Future" with a 6 foot speaker mounted into the wall. Amplifiers can be a tricky deal and can really make or break your sound.

Practice Amps

For starters, there is what we call the practice amp. This is a small amplifier that can be used at low to moderate volumes and maintain a simple good tone.  Practice amps are usually what we call "combo amps" where the amp and the speaker are in one unit (as opposed to a head and cab, where they are separate) They are low powered ( < class="Apple-style-span" style="color: rgb(51, 51, 51); font-family: Arial; font-size: 12px; line-height: 18px; -webkit-border-horizontal-spacing: 2px; -webkit-border-vertical-spacing: 2px; ">Crate FlexWave FW15R 15W 1x12  , the Roland Cube or a Line 6 Spider III, Now do not expect a lot from these amps. They may have built-in effects or amp models, but don't expect much. These amps run around $100. If you move up just a little to something like a Fender Frontman I used this particular amp live for about a year and got decent sound out of it ( mic'd up ). It is basically a slightly larger practice amp.

The Big One

The next step for amps is almost as hard as the next step for guitars. There are so many options and price ranges. You can easily spend $300-$1000 on a amp to play out on. Here are some things to keep in mind and to look for.

Tube Vs Solid State

This is a big debate about which one is better. Personally, I tend to like the sound of a nice tube amp, but unless you find a smoking deal, they are generally very pricey.  A rule of thumb that I have heard is that a tube amp of the same wattage as a solid state is about 3 times louder. I'm not sure how true that is, but anecdotally , it seems to be true. Tube amps need more special care than a solid state. But there are a few things that solid state can offer that tube amps usually do not. 

Combo Vs Head/Cab

Unless you are looking to blow out a large venue, a head with a cab may be a bit excessive. Most students will do fine with a well sized combo amp.

Wattage

For a garage band musician a 25-50 watt tube amp or up to a 100 watt solid state should more than get the job done. 

Speakers

Amps generally have an indication like 1x10 or 2x12 to indicate how many of what size speakers they have. So a 2x12 has 2 twelve inch speakers in it. For fullness of sound, a 1x12 or a 2x12 will do very well for you. There are a few amps that have smaller and sound good, but generally a 12 feels a bit more full to me. If you want a 4x12 you generally need to move to a head/cabinet setup as a 2x12 is about as big as a combo gets. 

Built in Effects / # of Channels 

A growing trend in amps is built in effects. If you look at the Line 6 Spider III amps, you will see their low end models have a few effects to their upper end amps that are fully programmable.  A lot of non-built-in effects amps have reverb built in. It will quite possibly be  a spring reverb unit in the back of the amp. 

Some amps also have more than one "channel",  a clean channel and one or more "drive" channels. The clean channel is the amplified sound of the guitar, clean and clear, The drive channel is a 'distortion' effect. If there is more than one drive channel, it is generally set up for varying levels of distortion. Depending on how the drive channel sounds on the amp, most players will always leave their amp on the clean channel and add distortion or other effects through an effects pedal or unit of some kind. If their amp has a really good sounding drive channel they may opt to use it.

Now most amps are content to sound like themselves, where another newer trend in amps is what is called "amp modelling" where an amp tries to emulate the sound of other amps. Line 6's higher end amps do this pretty well, where they also have an effects unit that does it VERY well. We will talk about that in the post on effects. 

Now when it comes to amps, I am of a very minimalist mindset. Give me an amp that produces a great full clean tone and let me tweak my sound before it gets there with my guitar and my effects. Currently I use a Crate V33-212. It is a 33 watt tube amp and it is very nice, especially for the price it was gotten at. Some folks live and die by their amp choice.  My advice, try lots of them. If you go to a place like Guitar Center, be sure to ask to use a guitar similar to what you own when trying out amps, that way you will have a good idea what it will sound like when you get it home.

Are you a guitarist? What was your starter amp? What is your favorite amp and why? Post your thoughts below! For those looking for advice, was this information helpful, do you need more info on a given part in this overview? Let me know!

Tuesday, December 23, 2008

Guitar Gear for Beginners - Part 1 - The Guitar

I have been teaching guitar lessons for about 10 years. I have had students ranging in age from 7 to mid 40's. But usually, most of the kids are 10 to 18. Generally speaking they have a hand-me-down guitar or something that was picked up at a yard sale. Occasionally they have a nicer used instrument or something that a parent went out and picked up so their kid could check it out. It has generally been the exception to the rule that one of these instruments is quality. I have seen my share of 'walmart' instruments or things that I would put more in a 'toy' category rather than an 'instrument' category. Over the past few years with the popularity of games like Guitar Hero and Rock Band, I have certainly seen a surge in interest in guitar lessons. Also with that I have seen parents who are a lot more interested in getting their kids a quality instrument to play on, or at least something that is not junk, but at the same time they want to minimize their investment in case their kid figures out that playing a real guitar takes more effort than beating Slash on Expert on Guitar Hero. So after helping several folks figure out what their next move for their kids are this Christmas, I decided that a post might be in order.

The Guitar

Undoubtably the centerpoint of new gear for a kid when doffing the plastic virtual guitar is the axe itself. There are certainly many tiers of guitars covering a wide variety of prices. I have been asked many times if acoustic is a better way to start guitar, well personally, I don't think so. I'll probably write another whole post on that later. So these suggestions will all be electric.

The Starter Guitar $100-$180

The Squier by Fender - This is a staple starter guitar. The bare bones essential starter. There are 2 types the Bullet which is around $100 and the Affinity which is about $170. The affinity has a slightly better hardware on it. There is also the Squier Mini which is a 3/4 size guitar. If your child is  a younger starter or has overly small hands a 3/4 size might be a good idea. Otherwise your average 9-10 year old should be able to handle a full size.

The Epiphone Specials - The other big player here in starter guitars is the Epiphone "specials" The SG Special and the Les Paul Special II. These guitars run about $170 - $180. They are solid "no frills" versions of the higher level Epiphone SGs and LPs, or if you like, very low versions of the original Gibson versions of these instruments.  

For most kids the difference between the Affinity Strat, The LP Special II and the SG Special are looks and there are several colors available in each. I would recommend trying to get an idea which style and color your beginner likes best as they will be more likely to want to play an instrument that has a personal feel to it. As for quality, these 3 instruments are pretty close. 

The Next Step $300+

Once a player has shown that they are committed to playing and devoting the time needed to 'stick with it', it is a good idea to move them up to the next level. If their starter is still in good condition, you can probably get a fair amount out of it, or hold on to it so they can always have "Their first guitar" (I wish a shelf hadn't fallen over on my first guitar and cracked the neck). 

Now this next step is different for every student. A big part of the next step is dependent on a couple factors.
  • Seriousness of the student
  • What are they wanting to do with it?
  • Financial Considerations
If your student has been playing for a couple years and couldn't care one way or another if they continue, it might not be a wise investment to upgrade them. Now I know this seems like common sense, but I put this in the same category with folks who by a $600 guitar for a student who has never picked one up before and plays it for 2 months. 

Next is what they want to do with it. Are they wanting something to strum on every once and a while to get away, or have they already started their own band in the garage and are in the process of recording a CD? It goes hand in hand with how serious they are. But if they plan on playing "out" a higher quality instrument may serve them better. 

Finally there are financial considerations.  If you are like most parents, you do not have a limitless supply of cash. If you are reading this than you probably have a child in lessons at $15-$25 a week, plus who knows what else.  You want the most "bang for your buck" and you want something that will last. Let me make a few suggestions. When I was at this point myself, I was 14, I had been playing for a couple years and was in need of a guitar (see note on starter guitar). My father told me that he would not buy me a guitar outright. He had purchased my starter guitar and amp, but this time it would be a little different. He set up a matching program. He would match me dollar for dollar on a new guitar. Little did he know that I had a pretty cleaning job lined up for that summer and was able to put together about $500. So armed with $1k he and I went down to Daddy's Junky Music Store in Portland, ME and I picked out my guitar, an Ibanez 540S LTD. This was a major step up for me and it was my full time guitar for about 17 years.  So this step can be a big one, but having the student invested in it as well can make a world of difference.

 If you go with a oddly shaped guitar (not a standard strat,lp,sg,tele, etc style, not necessarily the brand name ones mind you) you may be getting something that will be 'dated' in 10 years. If this is a 10-20 year investment, then getting something a little more timeless might be in order. That is not to say that funky shapes and such don't have thier place, I'm just saying that a 14 year old picking a $1000 guitar can be scary. 

Also what style of music does your student ENJOY playing? When I give lessons my students understand that although I am teaching them to read music, they are free to explore whatever styles of music intrest them. What types of guitars are their favorite artists playing? And please realize that it is ok for them to like xyz type of music (lyrics aside, that is a whole different conversation). Even though it may not be your thing, allowing them to explore while being as open (musically) as possible is a good thing. So I say ALL this to point out that the 2nd guitar is a lot more personal for a student and may last them a long time. When the time, interest level, and finances all line up then you are ready to make that purchase that will inspire your musician for years to come.

Next time we will talk about the next part in getting set up for the beginner...the amp.

If you have advice for the beginner, please feel free to comment!

Monday, December 22, 2008

Quick Note - Gear Reviews and Such Coming

I have a series of installments coming up that hopefully will be helpful to those of you looking to buy some musical gear, as well as some thoughts on good gear for beginners. So stay tuned! P.S. If you are checking out  my blog for XNA stuff only, here is a great suggestion, when you are not coding you should pick up a guitar and play!

Monday, December 01, 2008

Guitar Article Index

Music / Guitar Articles

While there has been a rise in popularity in games like Guitar Hero and Rock Band, there has been a secondary effect of having a renewed interest in music as a whole. The past year has a marked a dramatic increase in the amount of people either asking for guitar lessons or for advice on what new guitar gear they should get for themselves or their child. So in response to that, interest, I have started writing a series of articles to help explain some gear as well as give a little advice into this area. In the future, I'll also be writing some gear reviews as well as some more advanced gear articles. 

Starting Gear Articles
Choosing a Guitar
Choosing an Amp
Effects - Distortion
Effects - Filter
Effects - Volume
Effects - Modulation
Effects - Time Based
Effects - Pitch
Coming Soon...
Effects - Multi Effects
Other Accessories


Advanced Gear Articles
Coming Soon
Gear Reviews
Coming Soon

Monday, November 24, 2008

XNA Series - 3d textures from Blender

A quick note, if you are exporting an object with uv images, you need to add the images to a subfolder of your Content folder called fbx (under the folder you are putting your fbx files) This is where the fbx exporter for blender is saying that the image files related to your object are. Now you don't actually have to create this folder in your solution explorer, just in your directory tree, or you can do it in the solution explorer, but you will need to then right click on the image and say "exclude from project". This is because the fbx import process in XNA does the texture loading behind the scenes. If you leave the file in the content pipeline, it will try to import the image 2 times and you will get unneeded warnings.

Saturday, November 22, 2008

XNA Series - Begining 3D - Part 1

I have been wanting to get some posts on here about 3D. But since it is a much more complex subject than 2D, I have been holding off as I am still getting my head around it. Perhaps we can work through this together and see what we come up with.

To start drawing in 3D, we need a model. I recommend something like Blender3D, since it has all the tools you need to create a working 3d model that you can import into XNA. This is not a tutorial about modeling in blender, perhaps I'll do that later. But once you have a model created in Blender, you want to export it in Autodesk FBX format. You can load that into your content pipeline in the same way you import a sprite. The difference is in the type of C# object we create to load it into. Rather than a texture2d object, we load in this model as a Model object. We will also create a Vector3 object to set it's position rather than a Vector2, since we need to put this model in 3d space.


Project Files


Model tower;
Vector3 pos = Vector3.Zero;
The next 4 objects in our game class declarations are a little more complex.

Vector3 camPos = new Vector3(0.0f, 60.0f, 160.0f);
Vector3 camLookAt = new Vector3(0.0f, 50.0f, 0.0f);
Matrix camProj;
Matrix camView;

Vector3 camPos will store the location of our 3d camera. Our 3d camera can be thought of as a video camera placed into the 3d world at a given location.

camLookAt is a point at which our camera will be pointed in 3d space.

the 2 Matrices camProj and camView are somewhat more complicated and we will set them up later.

To load in our Model's data, in LoadContent we will do this

tower = Content.Load<model>("tower");

that should look familiar, since it is the same way we loaded in images. Except we make sure to tell the Load function it is dealing with Model objects rather than Texture2D.

Next we initialize the camView matrix

camView = Matrix.CreateLookAt(camPos, camLookAt, Vector3.Up);

We create a 4x4 matrix from the position of the camera and the point it is looking at. This matrix gives us a way to alter the way we see the model so that it looks like we are seeing it from the camera. Then we set up the projection matrix

camProj = Matrix.CreatePerspectiveFieldOfView(
MathHelper.ToRadians(45.0f),
graphics.GraphicsDevice.Viewport.AspectRatio,
1.0f,
10000.0f);

which will alter the way we see the model in perspective. We pass this method the width of our view field (45 degrees). the aspect ratio of our graphics device and the near and far limits to what we can see (clipping planes). If you don't fully understand these matrix operations, its ok, just press on for now.


We are almost there, we need to create a method that applies all these things to our model. Since we will want to draw more than one model in the future, we will make a generic function. We call it DrawModel and will pass it a model to be drawn, it's position and a scale (to make it bigger or smaller). In a model object we can have many meshes. So we need to loop through them all. Then each mesh has a list of "BasicEffects" which control how that mesh will be drawn, so we loop through those too. For each basic effect we will do the following
  • enable lighting
  • set lighting preferences
  • set the World, Projection and View transformation matrices for the effect
Then for each mesh, we draw the mesh

void DrawModel(Model model, Vector3 modelPosition,float scale)
{
foreach(ModelMesh mesh in model.Meshes){
foreach (BasicEffect effect in mesh.Effects)
{
effect.EnableDefaultLighting();
effect.PreferPerPixelLighting = true;

effect.World =
Matrix.CreateTranslation(modelPosition)*
Matrix.CreateScale(scale)
;

effect.Projection = camProj;
effect.View = camView;
}
mesh.Draw();
}
}

All that is left at this point is to call DrawMesh from our Draw method with appropriate parameters.

DrawModel(tower, pos,10f);

I've added a couple extra calls to DrawModel in the project file so you can see a little "scene"


Friday, November 21, 2008

Trying Tubes in a Crate V33-212

I like to tinker. So it should be no suprise that now that I have a tube amp I want to do a little testing to see what it is capable of.  I emailed Crate to see about the best way to get into the amp and they provided me with the Final Assembly Schematics for the amp, which showed that removing 2 screws allowed the amp assembly to pivot down.


So what you see here is the transformer, the 4 EL84 tubes and the 3 12AX7 tubes.  I borrowed a 12AU7 tube from a friend to see what that would do inserted into the V3 position (the leftmost tube in the front row of this picture). Being that the 12AU7 has a substationally lower gain than a 12AX7 it cleared up the clean channel which when it was on 0 volume had a slight low hiss, but since now the power tubes were getting a lot less power from the inverter tube, it was much quieter. I did have to turn the amp up much louder to get the same volume and it started to break up the clean channel at a lower volume then before. But there was a bit of fullness that I seemed to lose. Not sure I am ready to make this change. I need to test some more first. My friend also recommended rather than a 12AU7 a 12AT7 which has a gain level somewhere in between the U and the X. All I know is that either way the amp sounds really good, I'm just not sure which way sounds better yet.


Free Chord and Scale Diagram Paper

In teaching guitar I spend a lot of time teaching my students chords and scales. I have several pages that I have made up with chords and scales on them, but they are a bit much for the beginner. Too many chords or too many scales that it is hard to focus. So I generally like to write out the couple of scales or chords that I want them to practice for that week on a sheet of paper. But again if I make them too small they are hard to read from. So I created some nice sheets you can print off with 9, 4 fret chord blocks and 6, 8 fret scale blocks. So I hope there are helpful to you.

These links are fixed now. Sorry for the previous inconvenience.

Chord Blocks
Scale Blocks

Monday, November 17, 2008

Blog Posts, Christmas Music and Sweet Tracks

Well I got off to a pretty good start there on the XNA series, but unfortunately my lack of free time has caught up with me. I'll be posting again in the XNA series soon, I'm just not sure how soon. So for those of you who are coming here for XNA, I apologize for my lack of material. For those of you who come here for other reasons...I'm not really sure why you are coming here :)

For those of you in the St Louis area and want to come see a program of instrumental Christmas music ranging from Rock to Jazz to Classical. Come on out to the Greenville First Christian Church on Sunday, November 30th at 7:00pm. Admission is free with the donation of a canned good for the local food pantry. I'll be playing guitar along with half a dozen other very talented musicians. including Luke DeJaynes, the drummer from a great band out of St. Louis, MO, Fundamental Elements. Seriously, if you have not heard FE, check out their website, it has some of their tunes on it you can stream. Take a listen. I absolutely recommend their new album, you can get it on iTunes, it's called "The Cycle We're Livin' In".

Anyway, if you are interested in the Christmas show and you want to know where that is, it's here, we would all love for you to come out:

Friday, November 07, 2008

A Simple but Good Game Creation Article

I came across a good article on a path to Game development. It seems the original site is now non responsive, but the web archive of it still exists. This short article was a recommendation from an indie game developer about a series of game clones to try to complete in an effort to learn by doing. The article is from 1999, but I think it has some good suggestions. The idea is that you create these clones from your knowledge of the games listed and to make a complete game out of each. The games he suggests are

A Tetris type game
A Breakout type game
A Pac-Man type game
A Platformer (Super Mario type game)

He gives reasons for each and this seems like a good path. He really stresses the importance of making each of these into a finished working game, so that you have the experience of FINISHING a game rather than starting one, over and over.

The original article is here on the web archive.

Wednesday, November 05, 2008

XNA Series - Game Components

Ok, I know I said the next article would be about steering, but the next article for that topic is not ready yet, so I thought I would talk about a pretty cool class in XNA called GameComponent and its child Class DrawableGameComponent. These classes are made to add components to your game in a modular way. A component is something that needs to update with your game. DrawableGameComponent inherits GameComponent and adds functionality so that the component is also drawn at proper times as well. You could actually re-design our GameObject class as a DrawableGameComponent or at least inherit a class from DrawableGameComponent to give us the added functionality. Now from my reading, it seems that a lot of people think GameComponents are are really aimed at single game objects like a tank, but to add a TankManager class that would deal with the updating and drawing of all the tank objects in our game. But it certainly doesn't hurt to learn the type in an easy way.

We will create a UserTank class that is derived from DrawableGameObject. We just need to implement the basic constructor which takes a Game Object. So our UserTank will get all the functions (except private ones) of the DrawableGameObject class.


public class UserTank : DrawableGameObject
{
public UserTank(Game g)
: base(g)
{
}
}


To begin this is actually all we need to add this tank to our game. In our game class we would add


UserTank hero;


and in our constructor we would initialize it in the same old way


hero = new UserTank();


but we do something a little different after that


Components.Add(hero);


Since the hero tank is a UserTank which is derived from DrawableGameObject which is Derived from GameComponent, we can put it in the GameClasses list of GameComponents. These GameComponents all get called on updates and if they are drawable, they get their draw methods called.

So now even though there is nothing "in" our UserTank class, it is being updated with our game. Lets add a couple bits of info to the UserTank class that will help us out. To save time and space, I will implement the fields of the component as public rather than making them Properties. This is lazy, don't follow my lead in this.


public Vector2 location = Vector2.zero;
public Texture2D sprite;
SpriteBatch spriteBatch;


So we can store our location, sprite and a spritebatch to draw to. Then we simply override LoadContent, Update and Draw.


protected override void LoadContent()
{
spriteBatch = new SpriteBatch(this.GraphicsDevice);
sprite = this.Game.Content.Load("tank");
base.LoadContent();
}

public override void Draw(GameTime gameTime)
{
spriteBatch.Begin();
spriteBatch.Draw(sprite, location, Color.White);
spriteBatch.End();
base.Draw(gameTime);
}

public override void Update(GameTime gameTime)
{
KeyboardState ks = Keyboard.GetState();
if (ks.IsKeyDown(Keys.Up))
{
location.Y -= 1;
} else if (ks.IsKeyDown(Keys.Down))
{
location.Y += 1;
}

if (ks.IsKeyDown(Keys.Left))
{
location.X -= 1;
} else if (ks.IsKeyDown(Keys.Right))
{
location.X += 1;
}
base.Update(gameTime);
}


So as you see we initialize the spritebatch and load it's sprite. Then we call the base classes LoadContent method. In the Draw method we Begin our spritebatch, make a Draw call and End the SpriteBatch and then call the base classes Draw method. Then finally in the Update method we look at the KeyboardState and make some updates to the location and once again call the base classes Update method. So now that you have this component we could add it and it's logic in a very simple manner.


Here are the files for this project.

Tuesday, November 04, 2008

Stop Reading This Post

If you are a US Citizen of voting age and are still reading this, stop immediately and go vote. I won't tell you who or what to vote for, that is up to you. I am just telling you to go VOTE!

That is all. For the rest of my visitor's, enjoy watching the spectacle of the American political process.

Monday, November 03, 2008

XNA Series - AI - Better Steering - Part 1

I have been reading Steering Behaviors For Autonomous Characters by Craig Reynolds and after several reads I have decided to try to implement it in my own code and I think I am ready to explain it to you my loyal reader.

In his paper Mr Reynolds take a different approach that we have been taking thus far. Rather than having our steering be a simple rotation and moving forward at a set speed. He takes several other aspects into consideration, making a much more detailed simulation. To start we think about it in these terms: First we decide what direction and "magnitude" we need to move in that direction to steer us toward our goal. This is called our "Steering Vector". If we applied the steering vector all at once, we would immediately be put on the right path, but that would make for a very non-realistic simulation. Instead, rather, in the application of the steering vector, we take into consideration our current velocity, direction, mass and maximum force we can exert. We then factor these items against our steering vector to get an acceleration in a new direction to be added to our current velocity, we truncate this new velocity to our maximum speed and in that timestep we take a step towards steering to our goal.

The benefit of this method really lies in the Steering Vector. Since vectors can be scaled, added, subtracted, etc. We could apply several steering vectors. Say an object was following waypoints, we could say if an enemy is within a given distance, add the Flee steering vector times 50% and the Waypoint vector times 50%. We would then apply this new steering vector rather than just Waypoint or Flee, so that the object is still trying to do the waypoints, while evading.

In my next post, I will start looking at how we can adapt this method into our GameObject class.

The paper to which I am referring.

Saturday, November 01, 2008

XNA Series - A Simple Particle System

Sometimes you need to create a an effect like smoke or an explosion. This is when you can turn to a particle system. You can think of a particle system as an emitter. It emits points on given velocities, and each of those points has a lifetime. Once that lifetime is over they are no longer updated or drawn. This example will be a simple "fountain"

First, we will create a class to represent each particle. We will call it Particle

public class Particle
{
public bool alive = false;
public Vector2 position = Vector2.Zero;
public Vector2 velocity = Vector2.Zero;
public int lifeTime = 0;
}

So each particle has a field that shows if it is to be drawn an updated. A current position and velocity as well as a counter for how many updates it has been alive.


public class ParticleSystem
{
public int totalParticles = 500;
public Vector2 position = Vector2.Zero;
public Texture2D sprite;
public Particle[] parts;
public int current = 0;
public int end = 60;
public bool started = false;


In our particle system class we keep track of how many particles are in the system, the position of the emitter, the texture of the particles, an array of particles, a counter of how many updates the system has been through and if the system is running.


public void Init(){
Random r = new Random();
parts = new Particle[totalParticles];
for (int i = 0; i < totalParticles; i++)
{
parts[i] = new Particle();
parts[i].velocity = new Vector2(0 +(float)r.Next(-100,100)/100f,
-3 + (float)r.Next(-100,100)/100f);
}
}


Here is an init function. This will instantiate the particle array and set each member to new particle. I was also lazy here and set the initial velocity to [0,-3] with each component getting a number between -1 and 1 added to it for some randomness.


public void Start()
{
started = true;
}


This method simply starts the system

public void Update(GameTime gameTime)
{
if (started)
{
current++;
if (current < totalParticles)
{
parts[current].alive = true;
parts[current].position = position;
}
for (int i = 0; i < totalParticles; i++)
{
if (parts[i].alive)
{
parts[i].lifeTime++;
if (parts[i].lifeTime > end)
{
parts[i].alive = false;
} else
{
parts[i].velocity.Y += 9.8f/50f;
parts[i].position = parts[i].position + parts[i].velocity;

}
}
}
}
}


The update method first checks to see if the system is started. If so, it increments the total updates for the system and if we still have particles left, we set the next one to alive and set it's position to that of the emitter. Then for each alive particle, we increment it's life, if its been alive too long we kill it, if not, we add some gravity to it's velocity (taking into account elapsed time, and then add it's velocity to it's position.


public void Draw(SpriteBatch sb)
{
for (int i = 0; i < totalParticles; i++)
{
if (parts[i].alive)
{
Color c = Color.White;
c.A = (byte)((1-(parts[i].lifeTime / (float)end))*255f);
sb.Draw( sprite,
parts[i].position,
null,
c,
0f,
new Vector2(12, 12),
parts[i].lifeTime / (float)end,
SpriteEffects.None,
0
);
}
}
}
}


The draw method is very simple. I have added a couple extra things in it to make it more interesting. First we simply iterate over the particles and if they are alive, we draw them to the spritebatch. Now to make it more interesting I divide the life of that particle by it's total time to live. Then use that as a percentage to alter the alpha value of the drawing color and also to alter the scale of the object. I just to them in reverse so that the scale goes from 0 to 1 and the then the alpha goes from 1 to 0 (then I multiply it by 255 to convert it to a byte).

So yes, this is a VERY simple particle system, In the project files you will see that I update the position of the system based on keyboard controls, so you can move the emitter around.


The Project Files

Friday, October 31, 2008

XNA - Simulating Gravity

Now that we have talked a little about vectors and acceleration and such, lets put together a simple 'game' that takes a few of these things together. We will create a Game Object like we have been doing, but we are going to add an Update method to it that will move the updating of our object inside of it rather than outside.


public void Update(GameTime gameTime)
{
if (position.Y < 400)
{
velocity += new Vector2(0f, (float)(9.8 * gameTime.ElapsedGameTime.TotalSeconds));
}
else
{
velocity.Y = velocity.Y * -0.8f;
}
position += velocity;
}


So we pass the current gameTime into the object and check our location. If we are above 400 all we will do is acellerate based on gravity. Now Real gravity is -9.8 meters per second squared. So since we move "down" in XNA terms by adding to Y rather than subtracting, our Gravity velocity will be 9.8. Now 9.8 is relative in pixels So we are basically saying that 1 pixel is one meter. We could of course scale this. If our sprite is a person and is 25 pixels high and "in real life" that person is 2 meters tall, then really we want 12.5 pixels to represent a meter. So in that case we would scale any acellerations by 12.5 to get a more physically accurate simulation. You will also notice that my acceleration vector is not just [0,9.8] but instead I am multiplying by something you have not yet seen. gameTime.ElapsedTime.TotalSeconds. This is a representation in factional seconds of how long it has been since the last update. So since 9.8 is supposed to be per one second, if we multiply that by how long it has actually been (say 0.02 seconds) we will just get enough for the time that has past. That way no matter how fast or slow our program runs, the gravity acceleration should stay constant.

The only other thing that I am doing here is if my object falls below the 400 pixel mark. I make it bounce. I do this by negating it's Y velocity and scaling it back a little. The closer I scale the Y velocity to 0 the less it bouces back. If I scale it higher that 1 it will bounce higher then when it started in the first place.


Here are the project files.

Thursday, October 30, 2008

XNA - Version 3.0

XNA Game Studio 3.0 is scheduled for release today. I'm not sure what extra features it will have versus the Beta I've been using, but now that it is in it's stable release version, you should take the time to upgrade! I'm sure once the site is back up, there will be download links available at the XNA creators club website.

EDIT

So the site is back up with a 62.5mb download for XNA Game Studio 3. When I logged in, I had to edit my profile info again. There is also a survey that they want you to take about your involvement in making video games. Be aware though it is a lengthy survey.

Wednesday, October 29, 2008

XNA Sidebar - More Vectors

Another thing that vectors can do for us is handle acceleration. We already talked about moving at a certain velocity (distance and direction) but what happens if we want to continue on that path or speed up or turn in a new direction. We have to accelerate or slow down or have force applied to us in a new direction. If our object has a position P and a current velocity of [3,3] which means at every timestep we move 3 in the x direction and 3 in the y direction. If we want to speed up to [10,10] we could of course just set our velocity to [10,10], but that is very unrealistic. That would be like getting in your car and going 30 miles per hour, pressing the gas and in one microsecond be going 100 mph! The sheer force of that acceleration alone would probably kill you. Depending on your mode of transportation you have limits to how fast you can accelerate. This is defined by how much mass you have and how much force you can exert. Because if you took high-school physics, you may remember this.

F=ma

Which means: Force = Mass x Acceleration. This is Newton's Second Law of Motion. We would know the mass of our object ( say your vehicle weighs ton in english measurements. Which is approx 907kg) and we decide it should be able to go from 0 to 30 meters per second (which is about 60 miles per hour, use google to do your conversions!) in 10 seconds. Now we will assume for our simulation that acceleration is constant, that means every second we would need to go 3 meters per second faster. So we want to acellerate at a maximum of 3 m/s^2. So our maximum force is

907kg * 3 m/s^2 = 2721 Newtons or (kg*m/s^2)

But how do we apply this to vectors?

Well first we need to know our desired velocity. In my car example before we were going 30 mph and our desired velocity was 100mph (naughty speeder) That is velocity in 1 direction. Now lets think in 2. our current velocity is the vector [0,0] and we want to go [10,10] we cannot just jump from one to the other. In this case we can actually use the length of the vector to represent the force we would have to apply to go from one to the other. In this case the length of the vector is 14.14 well, say we determine that our maximum force is a vector length of 2, we truncate our desired vector to a length of 2 (we leave it alone if it is less than that already) and that gives us a vector which is the maximum force vector which we can apply to our object. So now that we have force, we divide that by the mass of our object say 10kg and that gives us our acceleration vector. Now for each timestep we do this calculation and add our acceleration vector to our current velocity to get our new accelerated velocity. We do have to truncate our velocity to our maximum speed since the length of our velocity vector is equal to our speed. Then we simply add our velocity vector to our position point and we have our new position for that timestep.

So some things we learned about vector lengths...

Length of the Vector between 2 velocity vectors is the total force required to accelerate from one to the other.

Then length of the velocity vector is the current speed

The Acceleration vector is gained by Dividing the Force vector by the mass of the object

The Acceleration vector is added to the velocity vector each time step to gain a new velocity.

Did I get something wrong? If you know more about this than me, please contribute by commenting below!

Tuesday, October 28, 2008

A Series of Tubes

No this isn't about the now convicted Senator Ted Stevens, or about the internet, this is about the most important type of tubes know to man. Invented by John Flemming in 1904, the vacuum tube.

Yes that's right I am the proud owner of a class A tube amp!
a Crate V33-212


The Fender on the bottom right was my current amp and it did ok, 25 watt solid state with a 10" speaker. But let me tell you what, this new amp sounds really good at 33 watts and with 2 12" speakers it has substantially more guts than the Fender (duh). It has a really full punchy sound with a nice crisp upper end. One thing I've found already is that my current pedal settings will need to totally change, since they were all geared toward the little Fender. Not that I mind tinkering :)

For those of you who come to the johnnyGizmo blog for XNA goodies, well this does fit in...sorta. I fully plan on recording background music for some XNA games using this amp. So you might just hear it.

If you are in the market for a tube amp, this one is priced to sell right now. Guitar Center and Musician's Friend have slashed the prices on this series of amps by over 50%. I think they aren't carrying them anymore, so now would be the time to snag one.

I've read some online that they have generic Crate speakers and Sovtek tubes. They sound fine to me so far, but sometime in the future, I'm sure that a tube upgrade and a speaker upgrade (maybe some nice celestions) would take this amp even further.

So I am really stoked about this amp, can't wait to play it in a band setting on wednesday night.

XNA Sidebar - Intro To Vector Math

I am not a math wiz, but I know enough to get around. I wrote my Sidebar article on Trigonometry to explain a few concepts that people might want to know to better program in XNA. Well according to my site metrics, it quicky became one of my most viewed pages. So apparently it was info people wanted to know! Well in that same spirit, I give you my intro to vectors post.

Vectors in 2 dimensions are relatively easy concepts, especially when you can visualize them. They have 2 parts, a direction and a magnitude. We can write them as a simple coordinate like [7,8]. Now, although this looks more like a point (and you are right) if we consider this as relative to another point, say (0,0) we now have a vector. As you can see the vector in the image has a direction and a length. In this case the length could be found by the Pythagorean theorem. where A is the x length and B is the Y length. So the length of this vector is the square root of 7 squared + 8 squared, which is 10.63.

One of the simplest operations we can do to a vector is addition. Say we take our vector [7,8] and add [1,3]. If we look at example B, we see the 2 vectors. But when we add them, we simply add their 2 components. Thus resulting in a new vector [8,11]. Which makes more sense if we look at example C where we have stacked the first 2 vectors. That is went from the endpoint of the first vector and moved 1 in the x direction and 3 in the Y. The same goes for subtraction, just minus instead of plus

Multiplication is another useful tool for Vectors. when we multiply a vector times a scaler (a single number) it "scales" the vector to a new length. So if we say [3,4] * 2 we end up with the vector [6,8] which is 2 times as long as the first vector. See Example D. Want some proof? The length of the vector [3,4]

LENGTH [3,4]
= SQRT[3^2 + 4^2]
= SQRT[9+16]
= SQRT[25]
= 5

[3,4] * 2 = [6,8]

LENGTH [6,8]
= SQRT[6^2 + 8^2]
= SQRT[36 + 64]
= SQRT[100]
= 10

and 10 is 2 times 5.

So we have double the length of the vector, but kept the same direction. Much like if we think of a vector as a force being applied to an object in a given direction it will go a certain distance. If we double that force, it will go twice as far. This works the same for division. dividing a vector by 2 will cut it's length in half.

One of the things that we may want to do is find out what the vector that goes in the same direction as this vector, but has a length of 1 is. This is called a unit vector and is gained when we normalize a vector. Luckily for us the XNA Vector2 class has a Normalize method which converts a Vector2 into a unit vector. This is really handy when we have a vector that we want to follow, but it is longer than our current velocity can carry us. Say we want to move from (0,0) to (5,5) we would add the vector (5,5) to position, but say our maximum speed for that movement is only 2. The vector [5,5] would take us aprx 7.07 in that direction. We need to find the vector that is 2 units long in the same direction. We can do that by Normalizing the vector [5,5] and then multiplying it by 2. So we scale it up or down to a length of 1 and then multiply it by the length we actually want it to be. So in c# that would look like this


float maxSpeed = 2;
Vector2 canGo;
Vector2 wantToGo = new Vector2(5,5);
wantToGo.Normalize();
canGo = wantToGo * maxSpeed;


When we multiply this out we get a point that is at [1.14,1.14] This is the vector [5,5] Normalized and multiplied by 2. You are going to see these vector method a lot in our new steering code, because a lot of the time we want to steer further than we are able to move so we have to scale back our vector to a size that we can actually move.

Monday, October 27, 2008

XNA Series - Refactoring GameObject

By now, our GameObject and GameAgent classes are getting out of hand, we have kept expanding them and now they are not very cohesive. There are several problems I see as I look at the code in front of me at this point:
  • Code Documentation is Pitiful
  • Lots of Public variables
  • Poor class planning
So a little restructuring is in order. First, I am going to copy all the extra methods out of GameAgent and bring them into GameObject. I can live with smart objects. Of course I'll need to change all the references to GameAgent to GameObject, but that is not too bad.

Next I want to move my variables from the access level of public to protected. This means that only objects that are derived from this class can see these variable, everyone who just uses an instance of the class has to get at them through either a method or a property (or not at all).

So for all the variables that need to be viewed outside the class (location, rotation, etc) I am creating a public Property.

Then to top things off, I am adding XML style comments to all my class members. Visual C# has a great shortcut for doing comments, on the line before a class or class member, type /// and it will prefill a template for a XML style comment.

for example, the code

public void SetPosition(Vector2 point)
{
this.position = point;
}

on the line before it, I typed in /// and got

/// <summary>
///
/// </summary>
/// <param name="point"></param>
public void SetPosition(Vector2 point)
{
this.position = point;
}


now I can just fill in my description and the decription for the point parameter. That makes life a little easier. Visual C# also uses XML comments in tooltips when you access that class member in some other area of your code.

You may have also noticed that I moved GameObject out of the class of the current game and put it in my own namespace johnnyGizmo. So when I want to use it in a new game, I just need to add a class from the solution explorer and in my file say

using johnnyGizmo;


Later when I am happy with how the class looks, i.e. it is finished, I can compile it to it's own library for simple use in other programs. You can see the refectored GameObject files Here

Sunday, October 26, 2008

XNA Series - Modular AI - Flee and Arrival

To continue with our modular AI discussion, we will first look at a "Flee" operation. Fleeing is the opposite of seeking. Rather than turning towards the current position of an object and moving forward, we will turn away from it and move forward. So first we will create a way to turn away from an object. You may remember we had a TurnTowards method, we will copy that method and call it TurnAway and simply make our target rotation Pi Radians (180 degrees) different from the rotation of TurnTowards

public void TurnAway(Vector2 target, float turnSpeed)
{
Vector2 difference = target - position;
float objectRotation = (float)Math.Atan2(difference.Y, difference.X)
+ (float)Math.PI ;
float deltaRotation = MathHelper.WrapAngle(objectRotation - rotation);
rotation += MathHelper.Clamp(deltaRotation, -turnSpeed, turnSpeed);
return;
}

and then we move forward. Since we are doing this as modular as possible, we can reuse the previous Move method.

So our Flee method is simply

public void Flee(Vector2 target, float speed, float turnSpeed)
{
TurnAway(target, turnSpeed);
Move(speed);
}


We also want to implement an "Arrival" behavior. Now so far TurnTowards and TurnAway have effected rotation and Move has effected position. Arrival will effect speed. We will pass Arrival a speed and it will be scaled based on position.

Now target is your target position, speed is your top speed, minDistance is the closest you want to get and maxDistance is the distance where you start slowing down.

public float Arrival(Vector2 target, float speed, float minDist, float maxDist)
{
float dist = Vector2.Distance(position, target);
if (dist > maxDist)
{
return speed;
}
else
{
float percent = (dist - minDist) / (maxDist - minDist);
return MathHelper.SmoothStep(0,speed, percent);
}
}

so we check our distance from the target and if we are outside of slowing range, we just move on ahead otherwise we check what percentage of the slowing range we are then apply smoothstep between our desired speed and 0 using the percent to pick our new speed. Now of course if you have an object with variable speed, you will need to tweak how you use this, but this is bare bones, what can I say. To use this method, I can do this to combine it with Seek

Seek(target, Arrival(target,speed,17,80), turnSpeed);

In the example code, you will see that I injected it into FollowPath to make the tank slow down at each stopping point.


Here are the project files

Saturday, October 25, 2008

XNA Series - Showing the Mouse

Here is a quick one for today. You may have noticed that when using your mouse with XNA that it disappears when entering the game area. This is because XNA wants you to determine what your mouse looks like. If you are programming a game with a mouse or cursor type interface (remember that XBOX 360 and Zune gamers do not have mice!) you probably want a custom mouse cursor. Well, it is really very simple. If we take our basic GameObject class (our custom one we have been using, this is not part of the XNA package) and create a instance lets call it mouseObject.

GameObject mouseObject;
and load it up in LoadContent
mouseObject = new GameObject(Content.Load<Texture2D>("mouse"),
0,0,
new Rectangle(0,0,25,25));

Then in Update we can update it's position
MouseState ms = Mouse.GetState();
mouseObject.position.X = ms.X;
mouseObject.position.Y = ms.Y;
Then simply call our custom drawing method in Draw
mouseObject.Draw(spriteBatch);


The only other thing that can be helpful here is if your mouse "hotspot" is not in the top left corner, you may want to add an offset value to your gameObject and then in your GameObject.Draw method, do position-offset for the image position. See the attached code sample to see what I did with that (it was an afterthought).

Now you should have your cursor drawn at your mouse's location. You could of course have various cursors in a spritesheet then simply change the source rectangle based on your need.

The source for this post

Friday, October 24, 2008

XNA Series - Modular AI - Waypoints

So in our last AI lesson we talked about 3 methods, TurnTowards, MoveForward and Seek. Where TurnTowards turned our rotation towards a point by an maximum amount, Move Forward moved us at a certain distance based on our rotation and Seek combined the 2 to let us move our GameAgent towards a goal.

In this post we will create a path made from Waypoints that we want our object to follow. We will start by adding a Waypoint class to our project. It will contain a position vector, and a bool indicating if we have visited it yet.

public class Waypoint
{
public Vector2 position;
public bool visted = false;

public Waypoint(Vector2 v){
position = v;
}
}


and then declaring a List collection of Waypoint objects in our game class

List<Waypoint> path;


and then initialize it in our constructor

path = new List<Waypoint>();


we can also add Waypoints to our path either here or in LoadContent like this

path.Add(new Waypoint(new Vector2(10,10)));
path.Add(new Waypoint(new Vector2(400,10)));
path.Add(new Waypoint(new Vector2(20,100)));
path.Add(new Waypoint(new Vector2(120,300)));

in Update we can do this to allow for adding new Waypoints during gametime.

MouseState ms = Mouse.GetState();
if (ms.LeftButton == ButtonState.Pressed)
{
path.Add(new Waypoint(new Vector2(ms.X, ms.Y)));
}


Now we need to create a new method in our GameAgent class called FollowPath. It will take a List<Waypoint> object, a speed and a turn speed as parameters.

public void FollowPath(List<Waypoint> p, float speed, float turnSpeed)
{


Now for each waypoint, we will check if we are within an certain distance and if so we will mark that Waypoint as visited

foreach (Waypoint w in p)
{
if (Vector2.Distance(position, w.position) < 20){
visted = true;


then if the current Waypoint is not visited, we will seek it and return


if (w.visted == false)
{
Seek(w.position, speed, turnSpeed);
return;
}
}
return;
}

So now in our Update method we can assign this action to our Agent

a.FollowPath(path,2.5f,0.1f);

and another action to another

b.Seek(a.position,2f, 0.02f);

So we have a following a path and b Seeking a. With the ability to add new points by clicking. Please be aware though that the mouse is not shown on the screen during gametime, so you have to guess where your mouse is (silly you may think, but I'll post on showing the mouse soon) So this example works out pretty well, You can tinker with the speed and turnSpeeds to see how they effect the movement.

So until next time...


The Project Files for this post

Thursday, October 23, 2008

XNA Sidebar - Trigonometry

One area that you may find yourself lacking is in the area of math. Especially when it comes to trig. In this post I want to talk a little about trig and how we can use it in our game programming.

First of it is very good to understand the concept of radians. The trig functions that you will be using in XNA deal with radians, and while you can convert radians to degrees, it is easier to just understand them.

We are used to the idea that a circle is 360 degrees, in radians that is equal to 2π. So all the way around the circle is equal to 0 to apx 6.28 radians, or 0 to 2π radians. Once you go past 2π, you are going around the circle again and can start measuring again. There is a helper function in the MathHelper class called WrapAngle(float angle) that takes a radian measurement and constrains it to -π to π (that is 2π total). So if your Radian Measurment was 3π, it would return a value of π since those 2 angles are equivelent.


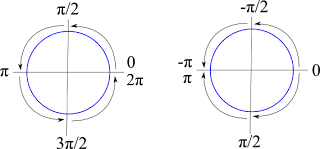
So as you can see from this image, we can look at either making a full circuit around the circle from 0 to 2π or going half a circle π in either direction.

This way we can spin like this in our code and stay within these bounds.


for(int i = 0; i< 1000;i++){
rotation = MathHelper.WrapAngle(rotation + 0.1f);
}


and although it looks like rotation would end up at 100, it actually ends up at -0.5309677 since the WrapAngle maps its value into the -π to π space.

The next question to deal with is this: I am pointing in a given direction and want to move forward 10. How do I determine how much I want to move in the X and Y directions to let me move 10 along my current path. The answer lies in Sin and Cos. If we take a right triangle we can discover the length of a side or an angle if we know 2 of the others. So in this case, we are pointing along the hyp and want to move 10 in that direction. So we want to find the length of the opposite side and the adjacent side. We do this in 2 steps. 1st to find the opposite side (which will be the Y value we add to our current location, we use the Sine function.

Sin(angle) = opposite / hypotenuse

We know the angle from our object's current rotation and we know we want the hyp to be 10 we get this

Sin(rotation) = Y / 10

and if we multiply both sides by 10 we get

10Sin(rotation) = Y

So our Y coordinate for the addition to our current position is 10 times the Sine of our rotation. To get the X coordinate, we do the exact same thing except use the Cosine function. Since

Cos(angle) = adjacent/hyp

In C# it looks like this...

float moveDist = 10;
Vector2D movement = new Vector2D();
movement.Y = moveDist * Math.Sin(rotation);
movement.X = moveDist * Math.Cos(rotation);


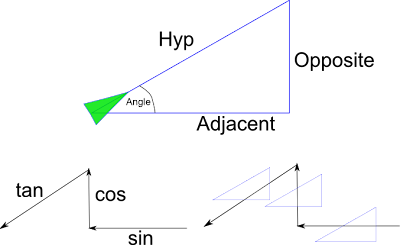
Now how do you remember which is which? Well if you take the image above with the 3 arrows, left arrow, up arrow, down-left arrow and think sin,cos,tan if we superimpose these arrows over 3 triangles you will see that the arrow shows you what order to put the sides in. The left pointing arrow goes over the opposite then the hyp, that is sine. The up arrow goes over adjacent then hyp, that is cosine, the the left-down arrow goes over opposite to adjacent that is tangent.

Now if you already know the 2 sides and need to find the angle instead, you can use the "Arc" versions of sine, cosine and tangent. They look like this

angle = arcsine(opposite/hyp)
angle = arccosine(adjacent/hyp)
angle = arctangent(opposite/adjacent)

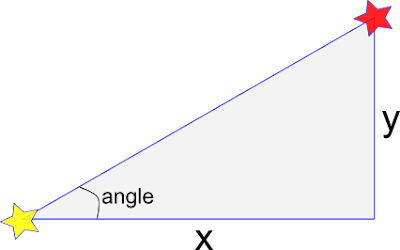
this last one ArcTangent is very helpful if we need to determine at what angle one object is to another. If you look at the example below, if we know the x and y distance from the yellow star to the red star, we can take the arctangent of y/x to get the angle in radians. The 'arc' functions are found in the Math library as Atan, Asin and Acos

So this is a little crash course in Trig. Did it answer your questions? Are there other things you would like me to cover? Let me know, talk back below!