Friday, October 31, 2008

XNA - Simulating Gravity

Now that we have talked a little about vectors and acceleration and such, lets put together a simple 'game' that takes a few of these things together. We will create a Game Object like we have been doing, but we are going to add an Update method to it that will move the updating of our object inside of it rather than outside.


public void Update(GameTime gameTime)
{
if (position.Y < 400)
{
velocity += new Vector2(0f, (float)(9.8 * gameTime.ElapsedGameTime.TotalSeconds));
}
else
{
velocity.Y = velocity.Y * -0.8f;
}
position += velocity;
}


So we pass the current gameTime into the object and check our location. If we are above 400 all we will do is acellerate based on gravity. Now Real gravity is -9.8 meters per second squared. So since we move "down" in XNA terms by adding to Y rather than subtracting, our Gravity velocity will be 9.8. Now 9.8 is relative in pixels So we are basically saying that 1 pixel is one meter. We could of course scale this. If our sprite is a person and is 25 pixels high and "in real life" that person is 2 meters tall, then really we want 12.5 pixels to represent a meter. So in that case we would scale any acellerations by 12.5 to get a more physically accurate simulation. You will also notice that my acceleration vector is not just [0,9.8] but instead I am multiplying by something you have not yet seen. gameTime.ElapsedTime.TotalSeconds. This is a representation in factional seconds of how long it has been since the last update. So since 9.8 is supposed to be per one second, if we multiply that by how long it has actually been (say 0.02 seconds) we will just get enough for the time that has past. That way no matter how fast or slow our program runs, the gravity acceleration should stay constant.

The only other thing that I am doing here is if my object falls below the 400 pixel mark. I make it bounce. I do this by negating it's Y velocity and scaling it back a little. The closer I scale the Y velocity to 0 the less it bouces back. If I scale it higher that 1 it will bounce higher then when it started in the first place.


Here are the project files.

Thursday, October 30, 2008

XNA - Version 3.0

XNA Game Studio 3.0 is scheduled for release today. I'm not sure what extra features it will have versus the Beta I've been using, but now that it is in it's stable release version, you should take the time to upgrade! I'm sure once the site is back up, there will be download links available at the XNA creators club website.

EDIT

So the site is back up with a 62.5mb download for XNA Game Studio 3. When I logged in, I had to edit my profile info again. There is also a survey that they want you to take about your involvement in making video games. Be aware though it is a lengthy survey.

Wednesday, October 29, 2008

XNA Sidebar - More Vectors

Another thing that vectors can do for us is handle acceleration. We already talked about moving at a certain velocity (distance and direction) but what happens if we want to continue on that path or speed up or turn in a new direction. We have to accelerate or slow down or have force applied to us in a new direction. If our object has a position P and a current velocity of [3,3] which means at every timestep we move 3 in the x direction and 3 in the y direction. If we want to speed up to [10,10] we could of course just set our velocity to [10,10], but that is very unrealistic. That would be like getting in your car and going 30 miles per hour, pressing the gas and in one microsecond be going 100 mph! The sheer force of that acceleration alone would probably kill you. Depending on your mode of transportation you have limits to how fast you can accelerate. This is defined by how much mass you have and how much force you can exert. Because if you took high-school physics, you may remember this.

F=ma

Which means: Force = Mass x Acceleration. This is Newton's Second Law of Motion. We would know the mass of our object ( say your vehicle weighs ton in english measurements. Which is approx 907kg) and we decide it should be able to go from 0 to 30 meters per second (which is about 60 miles per hour, use google to do your conversions!) in 10 seconds. Now we will assume for our simulation that acceleration is constant, that means every second we would need to go 3 meters per second faster. So we want to acellerate at a maximum of 3 m/s^2. So our maximum force is

907kg * 3 m/s^2 = 2721 Newtons or (kg*m/s^2)

But how do we apply this to vectors?

Well first we need to know our desired velocity. In my car example before we were going 30 mph and our desired velocity was 100mph (naughty speeder) That is velocity in 1 direction. Now lets think in 2. our current velocity is the vector [0,0] and we want to go [10,10] we cannot just jump from one to the other. In this case we can actually use the length of the vector to represent the force we would have to apply to go from one to the other. In this case the length of the vector is 14.14 well, say we determine that our maximum force is a vector length of 2, we truncate our desired vector to a length of 2 (we leave it alone if it is less than that already) and that gives us a vector which is the maximum force vector which we can apply to our object. So now that we have force, we divide that by the mass of our object say 10kg and that gives us our acceleration vector. Now for each timestep we do this calculation and add our acceleration vector to our current velocity to get our new accelerated velocity. We do have to truncate our velocity to our maximum speed since the length of our velocity vector is equal to our speed. Then we simply add our velocity vector to our position point and we have our new position for that timestep.

So some things we learned about vector lengths...

Length of the Vector between 2 velocity vectors is the total force required to accelerate from one to the other.

Then length of the velocity vector is the current speed

The Acceleration vector is gained by Dividing the Force vector by the mass of the object

The Acceleration vector is added to the velocity vector each time step to gain a new velocity.

Did I get something wrong? If you know more about this than me, please contribute by commenting below!

Tuesday, October 28, 2008

A Series of Tubes

No this isn't about the now convicted Senator Ted Stevens, or about the internet, this is about the most important type of tubes know to man. Invented by John Flemming in 1904, the vacuum tube.

Yes that's right I am the proud owner of a class A tube amp!
a Crate V33-212


The Fender on the bottom right was my current amp and it did ok, 25 watt solid state with a 10" speaker. But let me tell you what, this new amp sounds really good at 33 watts and with 2 12" speakers it has substantially more guts than the Fender (duh). It has a really full punchy sound with a nice crisp upper end. One thing I've found already is that my current pedal settings will need to totally change, since they were all geared toward the little Fender. Not that I mind tinkering :)

For those of you who come to the johnnyGizmo blog for XNA goodies, well this does fit in...sorta. I fully plan on recording background music for some XNA games using this amp. So you might just hear it.

If you are in the market for a tube amp, this one is priced to sell right now. Guitar Center and Musician's Friend have slashed the prices on this series of amps by over 50%. I think they aren't carrying them anymore, so now would be the time to snag one.

I've read some online that they have generic Crate speakers and Sovtek tubes. They sound fine to me so far, but sometime in the future, I'm sure that a tube upgrade and a speaker upgrade (maybe some nice celestions) would take this amp even further.

So I am really stoked about this amp, can't wait to play it in a band setting on wednesday night.

XNA Sidebar - Intro To Vector Math

I am not a math wiz, but I know enough to get around. I wrote my Sidebar article on Trigonometry to explain a few concepts that people might want to know to better program in XNA. Well according to my site metrics, it quicky became one of my most viewed pages. So apparently it was info people wanted to know! Well in that same spirit, I give you my intro to vectors post.

Vectors in 2 dimensions are relatively easy concepts, especially when you can visualize them. They have 2 parts, a direction and a magnitude. We can write them as a simple coordinate like [7,8]. Now, although this looks more like a point (and you are right) if we consider this as relative to another point, say (0,0) we now have a vector. As you can see the vector in the image has a direction and a length. In this case the length could be found by the Pythagorean theorem. where A is the x length and B is the Y length. So the length of this vector is the square root of 7 squared + 8 squared, which is 10.63.

One of the simplest operations we can do to a vector is addition. Say we take our vector [7,8] and add [1,3]. If we look at example B, we see the 2 vectors. But when we add them, we simply add their 2 components. Thus resulting in a new vector [8,11]. Which makes more sense if we look at example C where we have stacked the first 2 vectors. That is went from the endpoint of the first vector and moved 1 in the x direction and 3 in the Y. The same goes for subtraction, just minus instead of plus

Multiplication is another useful tool for Vectors. when we multiply a vector times a scaler (a single number) it "scales" the vector to a new length. So if we say [3,4] * 2 we end up with the vector [6,8] which is 2 times as long as the first vector. See Example D. Want some proof? The length of the vector [3,4]

LENGTH [3,4]
= SQRT[3^2 + 4^2]
= SQRT[9+16]
= SQRT[25]
= 5

[3,4] * 2 = [6,8]

LENGTH [6,8]
= SQRT[6^2 + 8^2]
= SQRT[36 + 64]
= SQRT[100]
= 10

and 10 is 2 times 5.

So we have double the length of the vector, but kept the same direction. Much like if we think of a vector as a force being applied to an object in a given direction it will go a certain distance. If we double that force, it will go twice as far. This works the same for division. dividing a vector by 2 will cut it's length in half.

One of the things that we may want to do is find out what the vector that goes in the same direction as this vector, but has a length of 1 is. This is called a unit vector and is gained when we normalize a vector. Luckily for us the XNA Vector2 class has a Normalize method which converts a Vector2 into a unit vector. This is really handy when we have a vector that we want to follow, but it is longer than our current velocity can carry us. Say we want to move from (0,0) to (5,5) we would add the vector (5,5) to position, but say our maximum speed for that movement is only 2. The vector [5,5] would take us aprx 7.07 in that direction. We need to find the vector that is 2 units long in the same direction. We can do that by Normalizing the vector [5,5] and then multiplying it by 2. So we scale it up or down to a length of 1 and then multiply it by the length we actually want it to be. So in c# that would look like this


float maxSpeed = 2;
Vector2 canGo;
Vector2 wantToGo = new Vector2(5,5);
wantToGo.Normalize();
canGo = wantToGo * maxSpeed;


When we multiply this out we get a point that is at [1.14,1.14] This is the vector [5,5] Normalized and multiplied by 2. You are going to see these vector method a lot in our new steering code, because a lot of the time we want to steer further than we are able to move so we have to scale back our vector to a size that we can actually move.

Monday, October 27, 2008

XNA Series - Refactoring GameObject

By now, our GameObject and GameAgent classes are getting out of hand, we have kept expanding them and now they are not very cohesive. There are several problems I see as I look at the code in front of me at this point:
  • Code Documentation is Pitiful
  • Lots of Public variables
  • Poor class planning
So a little restructuring is in order. First, I am going to copy all the extra methods out of GameAgent and bring them into GameObject. I can live with smart objects. Of course I'll need to change all the references to GameAgent to GameObject, but that is not too bad.

Next I want to move my variables from the access level of public to protected. This means that only objects that are derived from this class can see these variable, everyone who just uses an instance of the class has to get at them through either a method or a property (or not at all).

So for all the variables that need to be viewed outside the class (location, rotation, etc) I am creating a public Property.

Then to top things off, I am adding XML style comments to all my class members. Visual C# has a great shortcut for doing comments, on the line before a class or class member, type /// and it will prefill a template for a XML style comment.

for example, the code

public void SetPosition(Vector2 point)
{
this.position = point;
}

on the line before it, I typed in /// and got

/// <summary>
///
/// </summary>
/// <param name="point"></param>
public void SetPosition(Vector2 point)
{
this.position = point;
}


now I can just fill in my description and the decription for the point parameter. That makes life a little easier. Visual C# also uses XML comments in tooltips when you access that class member in some other area of your code.

You may have also noticed that I moved GameObject out of the class of the current game and put it in my own namespace johnnyGizmo. So when I want to use it in a new game, I just need to add a class from the solution explorer and in my file say

using johnnyGizmo;


Later when I am happy with how the class looks, i.e. it is finished, I can compile it to it's own library for simple use in other programs. You can see the refectored GameObject files Here

Sunday, October 26, 2008

XNA Series - Modular AI - Flee and Arrival

To continue with our modular AI discussion, we will first look at a "Flee" operation. Fleeing is the opposite of seeking. Rather than turning towards the current position of an object and moving forward, we will turn away from it and move forward. So first we will create a way to turn away from an object. You may remember we had a TurnTowards method, we will copy that method and call it TurnAway and simply make our target rotation Pi Radians (180 degrees) different from the rotation of TurnTowards

public void TurnAway(Vector2 target, float turnSpeed)
{
Vector2 difference = target - position;
float objectRotation = (float)Math.Atan2(difference.Y, difference.X)
+ (float)Math.PI ;
float deltaRotation = MathHelper.WrapAngle(objectRotation - rotation);
rotation += MathHelper.Clamp(deltaRotation, -turnSpeed, turnSpeed);
return;
}

and then we move forward. Since we are doing this as modular as possible, we can reuse the previous Move method.

So our Flee method is simply

public void Flee(Vector2 target, float speed, float turnSpeed)
{
TurnAway(target, turnSpeed);
Move(speed);
}


We also want to implement an "Arrival" behavior. Now so far TurnTowards and TurnAway have effected rotation and Move has effected position. Arrival will effect speed. We will pass Arrival a speed and it will be scaled based on position.

Now target is your target position, speed is your top speed, minDistance is the closest you want to get and maxDistance is the distance where you start slowing down.

public float Arrival(Vector2 target, float speed, float minDist, float maxDist)
{
float dist = Vector2.Distance(position, target);
if (dist > maxDist)
{
return speed;
}
else
{
float percent = (dist - minDist) / (maxDist - minDist);
return MathHelper.SmoothStep(0,speed, percent);
}
}

so we check our distance from the target and if we are outside of slowing range, we just move on ahead otherwise we check what percentage of the slowing range we are then apply smoothstep between our desired speed and 0 using the percent to pick our new speed. Now of course if you have an object with variable speed, you will need to tweak how you use this, but this is bare bones, what can I say. To use this method, I can do this to combine it with Seek

Seek(target, Arrival(target,speed,17,80), turnSpeed);

In the example code, you will see that I injected it into FollowPath to make the tank slow down at each stopping point.


Here are the project files

Saturday, October 25, 2008

XNA Series - Showing the Mouse

Here is a quick one for today. You may have noticed that when using your mouse with XNA that it disappears when entering the game area. This is because XNA wants you to determine what your mouse looks like. If you are programming a game with a mouse or cursor type interface (remember that XBOX 360 and Zune gamers do not have mice!) you probably want a custom mouse cursor. Well, it is really very simple. If we take our basic GameObject class (our custom one we have been using, this is not part of the XNA package) and create a instance lets call it mouseObject.

GameObject mouseObject;
and load it up in LoadContent
mouseObject = new GameObject(Content.Load<Texture2D>("mouse"),
0,0,
new Rectangle(0,0,25,25));

Then in Update we can update it's position
MouseState ms = Mouse.GetState();
mouseObject.position.X = ms.X;
mouseObject.position.Y = ms.Y;
Then simply call our custom drawing method in Draw
mouseObject.Draw(spriteBatch);


The only other thing that can be helpful here is if your mouse "hotspot" is not in the top left corner, you may want to add an offset value to your gameObject and then in your GameObject.Draw method, do position-offset for the image position. See the attached code sample to see what I did with that (it was an afterthought).

Now you should have your cursor drawn at your mouse's location. You could of course have various cursors in a spritesheet then simply change the source rectangle based on your need.

The source for this post

Friday, October 24, 2008

XNA Series - Modular AI - Waypoints

So in our last AI lesson we talked about 3 methods, TurnTowards, MoveForward and Seek. Where TurnTowards turned our rotation towards a point by an maximum amount, Move Forward moved us at a certain distance based on our rotation and Seek combined the 2 to let us move our GameAgent towards a goal.

In this post we will create a path made from Waypoints that we want our object to follow. We will start by adding a Waypoint class to our project. It will contain a position vector, and a bool indicating if we have visited it yet.

public class Waypoint
{
public Vector2 position;
public bool visted = false;

public Waypoint(Vector2 v){
position = v;
}
}


and then declaring a List collection of Waypoint objects in our game class

List<Waypoint> path;


and then initialize it in our constructor

path = new List<Waypoint>();


we can also add Waypoints to our path either here or in LoadContent like this

path.Add(new Waypoint(new Vector2(10,10)));
path.Add(new Waypoint(new Vector2(400,10)));
path.Add(new Waypoint(new Vector2(20,100)));
path.Add(new Waypoint(new Vector2(120,300)));

in Update we can do this to allow for adding new Waypoints during gametime.

MouseState ms = Mouse.GetState();
if (ms.LeftButton == ButtonState.Pressed)
{
path.Add(new Waypoint(new Vector2(ms.X, ms.Y)));
}


Now we need to create a new method in our GameAgent class called FollowPath. It will take a List<Waypoint> object, a speed and a turn speed as parameters.

public void FollowPath(List<Waypoint> p, float speed, float turnSpeed)
{


Now for each waypoint, we will check if we are within an certain distance and if so we will mark that Waypoint as visited

foreach (Waypoint w in p)
{
if (Vector2.Distance(position, w.position) < 20){
visted = true;


then if the current Waypoint is not visited, we will seek it and return


if (w.visted == false)
{
Seek(w.position, speed, turnSpeed);
return;
}
}
return;
}

So now in our Update method we can assign this action to our Agent

a.FollowPath(path,2.5f,0.1f);

and another action to another

b.Seek(a.position,2f, 0.02f);

So we have a following a path and b Seeking a. With the ability to add new points by clicking. Please be aware though that the mouse is not shown on the screen during gametime, so you have to guess where your mouse is (silly you may think, but I'll post on showing the mouse soon) So this example works out pretty well, You can tinker with the speed and turnSpeeds to see how they effect the movement.

So until next time...


The Project Files for this post

Thursday, October 23, 2008

XNA Sidebar - Trigonometry

One area that you may find yourself lacking is in the area of math. Especially when it comes to trig. In this post I want to talk a little about trig and how we can use it in our game programming.

First of it is very good to understand the concept of radians. The trig functions that you will be using in XNA deal with radians, and while you can convert radians to degrees, it is easier to just understand them.

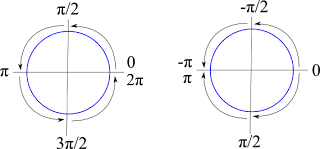
We are used to the idea that a circle is 360 degrees, in radians that is equal to 2π. So all the way around the circle is equal to 0 to apx 6.28 radians, or 0 to 2π radians. Once you go past 2π, you are going around the circle again and can start measuring again. There is a helper function in the MathHelper class called WrapAngle(float angle) that takes a radian measurement and constrains it to -π to π (that is 2π total). So if your Radian Measurment was 3π, it would return a value of π since those 2 angles are equivelent.


So as you can see from this image, we can look at either making a full circuit around the circle from 0 to 2π or going half a circle π in either direction.

This way we can spin like this in our code and stay within these bounds.


for(int i = 0; i< 1000;i++){
rotation = MathHelper.WrapAngle(rotation + 0.1f);
}


and although it looks like rotation would end up at 100, it actually ends up at -0.5309677 since the WrapAngle maps its value into the -π to π space.

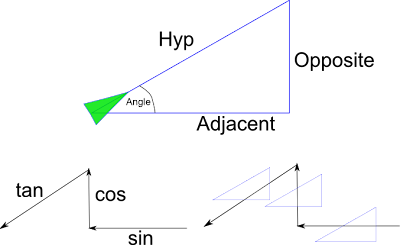
The next question to deal with is this: I am pointing in a given direction and want to move forward 10. How do I determine how much I want to move in the X and Y directions to let me move 10 along my current path. The answer lies in Sin and Cos. If we take a right triangle we can discover the length of a side or an angle if we know 2 of the others. So in this case, we are pointing along the hyp and want to move 10 in that direction. So we want to find the length of the opposite side and the adjacent side. We do this in 2 steps. 1st to find the opposite side (which will be the Y value we add to our current location, we use the Sine function.

Sin(angle) = opposite / hypotenuse

We know the angle from our object's current rotation and we know we want the hyp to be 10 we get this

Sin(rotation) = Y / 10

and if we multiply both sides by 10 we get

10Sin(rotation) = Y

So our Y coordinate for the addition to our current position is 10 times the Sine of our rotation. To get the X coordinate, we do the exact same thing except use the Cosine function. Since

Cos(angle) = adjacent/hyp

In C# it looks like this...

float moveDist = 10;
Vector2D movement = new Vector2D();
movement.Y = moveDist * Math.Sin(rotation);
movement.X = moveDist * Math.Cos(rotation);


Now how do you remember which is which? Well if you take the image above with the 3 arrows, left arrow, up arrow, down-left arrow and think sin,cos,tan if we superimpose these arrows over 3 triangles you will see that the arrow shows you what order to put the sides in. The left pointing arrow goes over the opposite then the hyp, that is sine. The up arrow goes over adjacent then hyp, that is cosine, the the left-down arrow goes over opposite to adjacent that is tangent.

Now if you already know the 2 sides and need to find the angle instead, you can use the "Arc" versions of sine, cosine and tangent. They look like this

angle = arcsine(opposite/hyp)
angle = arccosine(adjacent/hyp)
angle = arctangent(opposite/adjacent)

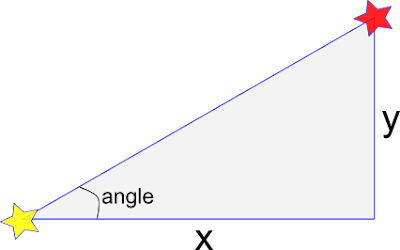
this last one ArcTangent is very helpful if we need to determine at what angle one object is to another. If you look at the example below, if we know the x and y distance from the yellow star to the red star, we can take the arctangent of y/x to get the angle in radians. The 'arc' functions are found in the Math library as Atan, Asin and Acos

So this is a little crash course in Trig. Did it answer your questions? Are there other things you would like me to cover? Let me know, talk back below!

XNA Series - Modular AI

In our last installment, we created a very specific AI interaction. We moved toward another object and then as we approached, we slowed down. In today's post we will look at breaking that out into more granular, reusable steps.

First Thing we need to do is to turn towards our target. Which may be an object, an agent or just some arbitrary location, like a waypoint on a track. Then no matter why we need to turn, we have a way to do a targeted turn. For the sake of flexibility, we will add a turnSpeed to the method so that depending on the call we can determine how fast we will turn.
public void TurnTowards(Vector2D target, float turnSpeed){
Vector2 difference = target-position;
float objectRotation = (float)Math.Atan2(difference.Y, difference.X);
float deltaRotation = MathHelper.WrapAngle(objectRotation - rotation);
rotation += MathHelper.Clamp(deltaRotation, -turnSpeed, turnSpeed);
}


and then we want to be able to move forward. So we create a move forward method.
public void MoveForward(float speed)
{
position.X += (float)Math.Cos(rotation)*speed;
position.Y += (float)Math.Sin(rotation)*speed;
}


where we determine what to add to our current location by getting a unit circle offset from us based on our rotation and then multiply it by our speed.

Now that we have these 2 behaviors, we can construct a Seek method, where we turn towards our target at our turnspeed and then move towards our target using our speed.
public void Seek(Vector2 target, float speed, float turnSpeed)
{
TurnTowards(target, turnSpeed);
Move(speed);
}

So with this in our Update method if we had to GameObjects that implemented this Seek method we could call

a.Seek(b.position,2f, 0.02f);

To set our a object seeking b. But like I said, we don't have to stop there, there are other things we can do with these methods. Check back next time and I'll talk about how we can make our objects follow a path that we add to by mouse clicking. (Code for this and the next project will be in the next post).

Wednesday, October 22, 2008

XNA Series - Basic AI

For today's post I want to take our first step towards 'AI'. Now please understand this and the following posts are not truly AI, but at least get us moving in a direction towards it. The Wikipedia entry for AI states the following:

...The study and design of intelligent agents,"where an intelligent agent is a system that perceives its environment and takes actions which maximize its chances of success. John McCarthy, who coined the term in 1956, defines it as
"the science and engineering of making intelligent machines."


So our idea is that some element or 'agent' in our game that can take data from it's surroundings and choose an action based on that data to take it toward it's goal. One of the MAJOR components of an AI is that it has a 'goal' something it is trying to accomplish. For instance an AI controlling a car in a racing game's goal is to get across the finish line first while staying on the course. While an AI for a target in a shooting game might want to avoid being hit. Or a "bad guy" AI who want to seek out a target. If you are serious about game AI, I would suggest reading this paper http://www.red3d.com/cwr/steer/gdc99/ on Steering Behaviors.


To start in this post, we will choose a very basic task. Agent A will start at a random location with a random rotation. Object B will start at a random location and do nothing. Agent A will rotate until it is facing Object B and will move forward until it reaches object B. So our agent has 3 tasks: turn, move and stop. Object
B just takes up space.


So what do we need for our example? An Agent A and an Object B. They will both be GameObjects. We can reuse our most recent GameObject Class from XNA Part 10 to start with. We will add a couple things to the game class to make this work.


float rotation = 0;
public Vector2 origin = Vector2.Zero;

Rotation will hold the current rotation of our object and origin will hold a "pivit point" for our object to rotate on. Then, update your draw call to use these parameters
public void Draw(SpriteBatch sb)
{
sb.Draw(sprite, position, texSource, Color.White, rotation,
origin,1,SpriteEffects.None,0);
}

Another addition is a property called Center
public Vector2 Center
{
get
{
return position + origin;
}
}
Which returns a screen based coordinate of the rotational center of our object.

So here is a tank and a missle for it to seek to. They are on one sprite sheet. We will add it to our project and create a game object for our missle, but hold off on the tank for a moment

//In our game class

GameObject b;

//In our Load Content Method

sprites = Content.Load<Texture2D>("tank-missle");
b = new GameObject(sprites,100,100,new Rectangle(50,0,50,50));
b.origin = new Vector2(15, 15);

Now in our GameObject file, after our GameObject declaration we are going to create a new
class derived from GameObject called GameAgent

class GameAgent : GameObject

{

}

So our new class GameAgent will have all the GameObject Stuff, but we can add to it and give it extra variables and methods. First we need to give it a constructor

public GameAgent(Texture2D inSprite, float x, float y, Rectangle src) :
base(inSprite,x,y,src)
{

}

Basically we pass everything on to our base class and let the GameObject set everything up. We will give GameAgent a couple fields


const float MAX_SPEED = 2;
public float speed = 0;

Now for each update, we will make a call to a method of our GameAgent for it to seek. So in our GameAgent class we will create a Method called Seek that takes a GameObject as a parameter.

public float Seek(GameObject target)
{
//First Move ahead along current angle

// The distance between the 2 elements
float distance = Vector2.Distance(position, target.Center);

//if we are far away, speed up to MAX_SPEED
if (distance > 100)
{
speed = MathHelper.Clamp(speed + 0.1f, 0, MAX_SPEED);
}

// If we are getting close, use the SmoothStep method to slow us down
else if (distance <= 100 && distance > 40)
{
speed = MathHelper.SmoothStep(0,MAX_SPEED, (distance - 30) / 70);
}

// If we are closer than 40, stop!
else
{
speed = 0;
}

// Use our current rotation + some trig to set our new location
// I'll explain later
position.X += (float)Math.Cos(rotation) * speed;
position.Y += (float)Math.Sin(rotation) * speed;


// Rotate Towards the Object

// Find Distance between this object and the target's center
float o = target.Center.Y - position.Y;
float a = target.Center.X - position.X;

// Find the angle between our unrotated object and the target
float theta = (float)Math.Atan((double)o / (double)a);

// If we are on the right of the object, we need to think a little backwards
if (position.X > target.Center.X)
{
theta = MathHelper.WrapAngle(theta + MathHelper.Pi);
}

// Add to our Rotation to point to the object
// theta-rotation gives us the difference between our current rotation and the
// offset of the target object to our 0 rotation point. This is ideally
// how much we want to rotate, but our agent can only turn so fast,
// So we need to clamp that change to our maximum turning amount.

rotation += MathHelper.Clamp(MathHelper.WrapAngle(theta - rotation), -0.05f, 0.05f);

// I return theta here so I can output it to the screen later, you don't really need to.
return theta;
}

I've added comments to the function code so you can see what is happening. Now this may of course not be the most optimal way for us to do steering, but it does work. I have been reading the work of Craig Reynolds and it does seem that he has done extensive work and research in this area. He uses a method in which the key points are more accurate to how objects might behave. I am currently trying to implement his concepts in my code and will get back to you when I accomplish something. But moving on.

Then in our LoadContent method we can initialize our agent.


a = new GameAgent(sprites, 300,300, new Rectangle(0, 0, 50, 50));
a.origin = new Vector2(25, 25);

Then in our Update method
a.Seek(b);
and Finally in our Draw method
            spriteBatch.Begin();
a.Draw(spriteBatch);
b.Draw(spriteBatch);
spriteBatch.End();

I also added this in our Update Class so I can move the target.

            KeyboardState ks = Keyboard.GetState();
if (ks.IsKeyDown(Keys.NumPad4))
{
b.position.X -= 3f;
}
if (ks.IsKeyDown(Keys.NumPad6))
{
b.position.X += 3f;
}
if (ks.IsKeyDown(Keys.NumPad8))
{
b.position.Y -= 3f;
}
if (ks.IsKeyDown(Keys.NumPad2))
{
b.position.Y += 3f;
}

When all is compiled, you end up with a missle that you can move and a tank that turns and drive to it and slows down and stops when it arrives. If you were a little lost by the trigonometry, don't fear, I'll have a XNA sidebar on that soon.

Code for this Post

References:

http://creators.xna.com/en-us/sample/aiming

http://www.red3d.com/cwr/steer/

Tuesday, October 21, 2008

XNA - I want to hear from you!

I'm a couple weeks into my XNA posting and I've been trying to get a new post out every day (some are arguably better than others) I've got a bunch of ideas still to come, but I would love to hear about what things you are interested in. If you have an area of XNA you would like me to explore in a post, please either take the poll on my sidebar or leave a comment in this post. I will gladly add your ideas to my list. Now of course I may not know about your requested area already, but I am always up for learning something new. Plus I love to hear from all the people around the world who happen to stumble upon my little blog.

XNA Series - Animation Part 2

In our last installment we created a sprite based animation and today I want to extend that a little. We are going to add a velocity to our character and scale his animation based on it. This is actually very simple. First we create 2 floats

public float velocity = 0;
public float maxVelocity = 1;


Then in our Update method, when we detect our key press, rather than updating the position, we will update the velocity + 0.1 for right and -0.1 for left. Then after the keyboard stuff we will update the position by adding the current velocity to the location.
            KeyboardState ks = Keyboard.GetState();
if (ks.IsKeyDown(Keys.Left))
{
a.velocity -= 0.1f;
a.frameNumber += 0.4f;

}
if (ks.IsKeyDown(Keys.Right))
{
a.velocity += 0.1f;
a.frameNumber += 0.4f;
}
a.position.X += a.velocity;
if (a.velocity > 0) a.direction = 1;
else if (a.velocity < 0) a.direction = 0;


Then we also check to see if our velocity is plus or minus to choose our direction. Now that we have a velocity, we can use that to scale our framerate. So rather than just adding 0.4 to our framecount whenever our key was down we will always add 0.4 scaled by our velocity each update
 a.frameNumber += 0.4f * (float)Math.Abs(a.velocity / a.maxVelocity);


as you can see we scale it by velocity/maxVelocity so when velocity is 0, nothing is added. We also take the Absolute value of the scale so that we are always adding to our value (otherwise our animation would run backwards, which may be desired at times). So now as we press our buttons we will see our character speed up and the animation speed up in relation to it.

Here is the source code: SpriteAnimation2.zip

Monday, October 20, 2008

XNA Series - Animation Part 1

Now, we may not always be using static images as our characters in our games, and sometimes we may want to have an animation, like when our character moves, his legs actually go back and forth. In 3d graphics, we would build these actions into our models, but in 2d we can pre-render these animations in frames and create a sprite sheet with all the different images of our animation.

Here is an example of such a sheet. It has 20 images of the same size, laid out in a strip.

I did this simple animation in Blender3D and then stuck it together using a little program called SpriteStripComposer that I someone put together for this very purpose. I wish Blender had a built in method for doing this, perhaps I should hit up some of my old dev pals for such a feature (or they would say "Code it Yourself!") Anyway,I am going to extend my GameObject class (see example code) with a derived class called AnimGameObject and I will add a few member variables to it
private float frames = 0;
public float frameNumber = 0;
public byte direction = 0;
The frames will hold the total number of frames in the spritesheet, the frameNumber will hold the current frame to be displayed and the direction will tell the Draw method to flip the image or not. We also add a new constructor

 public AnimGameObject(Texture2D inSprite, float x, float y, Rectangle src,float frm)
: base(inSprite, x, y, src)
{
frames = frm;
}
Which sends most of the construction to the base constructor, but also sets the frames to the number of frames passed in. Also note the when we pass in the src rectangle that we will point to the first frame of the animation and then use that data to find the rest. We also add an overridden version of the Draw method
public override void Draw(SpriteBatch sb)
{
Rectangle source = new Rectangle(((int)frameNumber)%(int)frames * texSource.Width,
0,
texSource.Width,
texSource.Height);

SpriteEffects se = SpriteEffects.None;
if (direction == 1)
{
se = SpriteEffects.FlipHorizontally;
}
sb.Draw(sprite, position, source, Color.White,0f,new Vector2(0,0),1f,se, 0);
}

First we build a new source rectangle that takes the float frame number and does a % frames on it so that we have an int between 0 and 20, we then pull the height and width from our original source rectangle. Next we create an object of type SpriteEffects and set it to None. then if direction == 1 we set it to FlipHorizontally. This will render our sprite facing the other way. Then finally we call the sb.Draw function and pass it the new source rectangle rather than the original and later in the call we pass it the SpriteEffects parameter.

Now in our game class we do things alot like we have before we declare an object of type AnimGameObject and load it up in our LoadContent method

a = new AnimGameObject(Content.Load<texture2d>("test"),0,0,new Rectangle(0,0,128,128),20);


and draw it the same in the Draw method

spriteBatch.Begin();
a.Draw(spriteBatch);
spriteBatch.End();


the main difference is in Update where we check our keyboard state and update our position, we also add to the frameNumber of the object. Now keep in mind that by default XNA runs at 60 frames per second, so you would not want to set this to update 1 frame per update, or this 20 frame animation would go all the way through 3 times per second. Instead we will set it to advance the frame 0.4f per update, that will run 24 frames per second or a little under 1 time per second (if we are holding down one of the keys) since we chop off the fractional part, when we use that number as an index, it will only make the frame change after it adds up past a whole number.
if(ks.IsKeyDown(Keys.Left)){
a.position -= 1f;
a.frameNumber += 0.4f;
}
Here is a link to the source code. SpriteAnimation.zip

Next time we will talk about frame rates and we will extend this example to make it more interesting.

Sunday, October 19, 2008

XNA Sidebar - SmoothStep and Lerp

Here is another bit of information for you when you are coding. There is a small class called MathHelper that you should become familiar with. It is in the Microsoft.Xna.Framework namespace. It contains 11 methods and 7 fields. The fields are 3 values of E (E, Log2E, Log10E) and 4 versions of Pi (Pi, Pi/2, Pi/4 and 2Pi) , but the things we want to talk in this post I want to
mention 2 methods in the class.

Lerp and SmoothStep are 2 methods in the MathHelper class that can assist us when trying to change from one value to another. If an object is going at one speed and needs to slow down to another there should be be a smooth transition between the 2 speeds. Or perhaps something needs to change from one value to another at a constant rate. These are the functions for you.

Lerp is short for Linear Interpolation, it makes a straight line between 2 values that you provide and gives you the value on that line at the percentage you pass it. It is the red line in the graphic.

Lerp(LowValue,HighValue,Percentage);

The second method is SmoothStep, you invoke it the same way as Lerp, by passing a low, high and percent (0.0-1.0) value. The difference is in the value it returns. As it's name implies, the value steps down smoothly from the first value to the second using a cubic function. It's example is the blue line in the graphic.

SmoothStep(LowValue,HighValue,Percentage);

So the next time you need to go between 2 values and you can determine how far into the transition you are, you can use one of these 2 methods to make a better transition.


EDIT

If you are interested in the code that I generated this example from, it is not in XNA (although it does reference the Microsoft.XNA.Framework assembly to get the Lerp and SmoothStep methods. Here is the file
LerpandSmoothStep.zip

Saturday, October 18, 2008

GetCals Download Location

For those of you who are looking for a getCals download...

DOWNLOAD GETCALS

XNA Part 10 - The Sprite Sheet


We have taken a little diversions with audio and collisions, but today I want to talk about a handy way to optimize your game. Up until now whenever we have wanted a sprite in our game we would just create an image and load it into our Content Pipeline and draw the whole thing. Now that is fine when you only have a couple...but say you have dozens of sprites. What is the best thing to do? Well here is one answer. A sprite sheet. this is basically a large image file that has your sprites separated into an organized grid. Here is an example of 4 sprites in a file, each in their own 100x100 spot in the file.

Now when we load in this sprite sheet we are not going to load it 4 times, that would be wasteful, instead we will load it once and pass it's reference to each game object that needs it. So I'm going to grab the GameObject class from my last project which keeps a Texture2D, a Position and the info needed for pixel based collisions. I can either extend that class or create a child class from it with new features. For now I will just extend the code for it. I am going to add a Rectangle object for the texture source. This will tell my object what part of the sprite image it needs to draw. I'll call it texSource. I will also add a member to the constructor to pass in a rectangle object to define the rectangle.

I will add a texture2D object to my main game class to hold the sprite sheet and in the LoadContent method, pull the sprite sheet into it, then pass that object to the new GameObjects along with the particular position of that GameObject's sprite in Rectangle format.

Now rather than creating 4 separate GameObjects, I have created an array of GameObjects


GameObject[] actors;

and after I load the sprite sheet in, I initialize the game objects.

actors = new GameObject[4];
actors[0] = new GameObject(spriteSheet, 0, 0, new Rectangle(0, 0, 100, 100));
actors[1] = new GameObject(spriteSheet, 0, 0, new Rectangle(0, 99 , 100, 100));
actors[2] = new GameObject(spriteSheet, 0, 0, new Rectangle(99, 0, 100, 100));
actors[3] = new GameObject(spriteSheet, 0, 0, new Rectangle(99, 99, 100, 100));

Now to siplify things when it comes time to draw these, I am going to make a GameObject draw itself (sort of). We will add a method to GameObject called Draw and it will take a SpriteBatch as a parameter.

public void Draw(SpriteBatch sb)
{
sb.Draw(sprite, position, texSource, Color.White);
}

So then in the Draw method of the Game class we can call

spriteBatch.Begin();
for (int i = 0; i < 4; i++)
{
actors[i].Draw(spriteBatch);
}
spriteBatch.End();

and handle the details of the Drawing call inside the object. Now of course, This will draw the 4 actors all stacked on top of each other, so for giggles, I'll add some Randomness to their initialization.

actors = new GameObject[4];

int x, y;
Random r = new Random();

x = r.Next(0, graphics.GraphicsDevice.Viewport.Width-100);
y = r.Next(0, graphics.GraphicsDevice.Viewport.Height - 100);
actors[0] = new GameObject(spriteSheet, x, y, new Rectangle(0, 0, 100, 100));

x = r.Next(0, graphics.GraphicsDevice.Viewport.Width - 100);
y = r.Next(0, graphics.GraphicsDevice.Viewport.Height - 100);
actors[1] = new GameObject(spriteSheet, x,y, new Rectangle(0, 99, 100, 100));

x = r.Next(0, graphics.GraphicsDevice.Viewport.Width - 100);
y = r.Next(0, graphics.GraphicsDevice.Viewport.Height - 100);
actors[2] = new GameObject(spriteSheet, x, y, new Rectangle(99, 0, 100, 100));

x = r.Next(0, graphics.GraphicsDevice.Viewport.Width - 100);
y = r.Next(0, graphics.GraphicsDevice.Viewport.Height - 100);

Now they should be in 4 different random locations.

From what I have read, the less Content loading you do the better, it is an "expensive" operation. So if you load and store 1 large image and reference parts of it, you are better off then loading many smaller images.

Project files for this post

Friday, October 17, 2008

Layout Changes

Please bare with me as I make some changes to my blog layout. I really didn't like how the default Blogger template was formatting things so I'm starting to mess around with it a bit to try to get a better feel.

XNA Part 9 - Pixel Based Collisions

Let me start by saying that the XNA Creators Club tutorials on collisions are really good and a lot of what I have learned so far has come from them. Check them out!

So on to pixel based collisions. You can of course collide on any data based in the pixels, but in our case we will look at the "Alpha" value. For those of you who are not familiar with the channels in a color, we represent color values with different components. There are several different ways to represent color, but in our case we will be using ARGB. The 'RGB' part should be familiar, this is the Red Green and Blue components of our color. The 'A' part stands for the Alpha, which is simply how opaque your color is. Where 0 is completely transparent and 255 is completely opaque. Notice that the values are between 0 and 255. This is because the 4 values are represented by the 'byte' data type which is an 8 bit integer type. 8 bits can hold 256 values and therefore in this case represent the numbers 0-255.

So the idea behind our pixel based collision is this: we look at the bounds of the 2 objects that we want to test and if they overlap, we examine the overlapping pixels in each image. If a pixel in both images is not transparent and overlapping, a collision has happened.

Now of course it will be up to you if you test for both pixels being 0 alpha for non-collisions or if you allow partial transparency to equal non-collision (i.e. both pixels have to be 255 alpha to collide rather than both being 0 to not collide).

Lets look at how we do this in our code.

We will store our pixel data in an array of Color objects for ease of use. So I'm going to add a Color[] to my GameObject.
public Color[] pixelData;

and in my constructor I am going to initialize it and load it up with my sprite's data.
pixelData = new Color[sprite.Width * sprite.Height]; 
sprite.GetData<color>(pixelData);


So we create the size of our pixelData array to be the sprite's height times width and then call the sprite's GetData method using the color type template and passing it the pixelData array to receive the data. Now we should have a lovely array filled will the pixel values of our sprite.

Now that we have pixel data to compare, we will rewrite our Intersects function to take it into account. We will take out our reference to the rectangle intersects() method. and start with our empty method.
public bool Intersects(GameObject b) { }


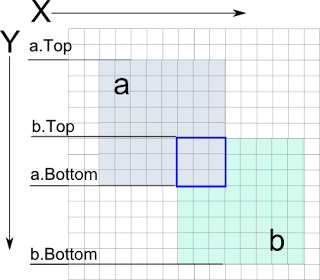
First we need to determine what the bounds of interection are. So we compare the tops and sides of the 2 rectangles. Remember that Y goes the opposite direction then we might think, so the top of a rectangle is a smaller number than the bottom. So we will compare the Top of a and b and see which one has a bigger value, meaning which one is LOWER on the screen. So in this case b's Top is a bigger number than a's Top since b's Top is lower on the screen than a's (confusing isn't it). So to find the lowest object Top on the screen we compare and choose the maximum Top between the 2 objects. You should also see that in this image b.Top is the top of our collision area.
int Top = Math.Max(Bounds.Top, b.Bounds.Top);


We also want the highest bottom on the screen so we look for the minimum value of a and b's Bottom.
int Bottom =  
Math.Min(Bounds.Bottom,
b.Bounds.Bottom);

Left and Right are easier since it moves in a more intuitive way. So we want the biggest Left and the smallest Right.
int Left = Math.Max(Bounds.Left,b.Bounds.Left);
int Right = Math.Min(Bounds.Right, b.Bounds.Right);

Now we can loop though using these values and extract the pixelData from the 2 GameObjects and compare them.
for (int y = Top; y < Bottom; y++)
{
for (int x = Left; x < Right; x++)
{

You will see the the for loops will not execute if top > bottom. That way, if the lowest top on the screen is below the highest bottom (ie the object are completely above and below each other) the loops will not happen. Then if they are vertically able to collide but horizontally not able to collide we don't execute the body of the inner loop. But if both work we get to the meat.

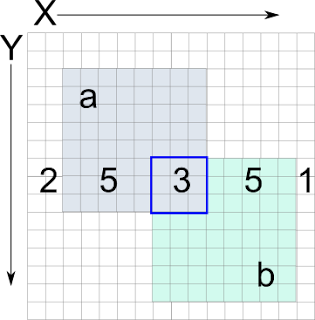
To discover where in the array of pixels we need to calculate where a particular pixel is. The pixels were stored by each row. So in this image we have our GameObjects textures as 8x8 grids. pixelData[0] through pixelData[7] would contain the first row. [8] though [15] would contain the next. So conviently we can do a little math to get us to our pixel. We take the row we want to access (starting at 0) and multiply by the width of the row (in this case 8) to give us the starting pixel in a row. Then we simply add the number of the pixel in the row we want to access (starting at 0) to that number and we have the index of the pixel we are looking for. Therefore our pixel index within a sprite becomes


pixelData [ rowNumber*rowWidth+colNumber ]


Now that we know how to access a given pixel how to we use the data we have to find the overlapping pixels and thier data. As we can see in this image, our x value would be starting at pixel 7 of the screen but only index 5 of object a and index 0 of object b. Since we can get the left value of object a (which is 2), we can subtract that from the value of x (7) and get the horizontal pixel index we need in object a (5). That would become our "colNumber" in our index formula. We determine our rowNumber in the same way with the y value. We get the distance of the y value from the "Top" of a by subtracting a's Top from the value of y. This gives us our rowNumber. We would then take the width of a as the rowWidth; so our formula for finding the pixel in a would be
Color colA = pixelData[(y - Bounds.Top) *
Bounds.Width + (x - Bounds.Left)];
Color colB = b.pixelData[(y - b.Bounds.Top) *
b.Bounds.Width + (x - b.Bounds.Left)];

Then we compare the colors and decide if they are a collision.
if (colA.A != 0 && colB.A != 0) 
{
return true;
}

Since it only takes one pixel for a collision, the first time we hit, we finish. After the loops you will want to add a return false if it makes it all the way through without a collision.

Now if you run this again with some objects that have transparency, you should find that they will only intersect when their pixels line up rather than their bounding boxes.

One caveat, this only applies to non-rotated, non-scaled textures. When we come back to collisions again, we will talk about how to handle those situations. But that will not be for a little while.

Thanks big time to the XNA creators club tutorial on Pixel based collisions, it was my primary learning source while preparing to write this post.

Thursday, October 16, 2008

XNA Part 8 - Simple Collisions

Most games that have any kind of movement need to detect object collision. There are many levels of object collision (as I am learning) that we can detect, but to start, we will look at simple rectangular collisions.

Here is the basic idea: First take 2 objects of type Rectangle which is defined this way

Rectangle a = new Rectangle(10, 10, 100, 100);

where we pass the X and Y coords of the top left corner of the rectangle and then the width and height of the rectangle. Then we create another one

Rectangle b = new Rectangle(20, 15, 100, 100);

Now we can call a member of the Rectangle class called Intersects() that will return a bool to tell us if if the 2 rectangles intersect.

So in this case since a and b do intersect,

a.Intersects(b)

would return true. We can use this type of information to help us out. In determining our game logic and behavior.

Here is an idea I came up with for putting this type of functionality into our GameObject Class. We can implement an Intersects method for our GameObject class that takes a GameObject as a parameter and then do our determining there. Here is the code for a simple GameObject

class GameObject
{
public Texture2D sprite;
public Vector2 position;

public GameObject(Texture2D inSprite,float x, float y)
{
sprite = inSprite;
position = new Vector2(x, y);
}

public Rectangle Bounds
{
get
{
return new Rectangle((int)position.X,
(int)position.Y,
sprite.Width,
sprite.Height);

}
}

public bool Intersects(GameObject b)
{
return Bounds.Intersects(b.Bounds);
}
}

We will hold only the texture and the position for now and we set them both in our constructor. Then we add a read only property called Bounds. This dynamically returns a Rectangle object that has been derived from the position vector and the size of the texture. Then in our Intersects() method we will ask our class for it's bounds and then see if it intersects with the bounds of our GameObject b. That way, we can later run code that looks like this.


GameObject a = new GameObject(Content.Load("test"), 10, 10);
GameObject b = new GameObject(Content.Load("test"), 300, 300);
if(a.Intersects(b)){
//Do something here
}

Now of course in this example, both GameObjects are hard coded to a location, so we would want to add code somewhere to get one of these puppies moving. So in our Update method I will add

a.position.X += 1.0f;
a.position.Y += 1.0f;

and flesh out my Draw method with

if(a.Intersects(b)){
graphics.GraphicsDevice.Clear(Color.Red);
} else {
graphics.GraphicsDevice.Clear(Color.Green);
}
spriteBatch.Begin();
spriteBatch.Draw(a.sprite, a.position, Color.White);
spriteBatch.Draw(b.sprite, b.position, Color.Blue);
spriteBatch.End();

So in the end, if a and b intersect, the background is cleared with red otherwise it is green.

This method works great when our Game Objects are rectangles, but if you recall, we are using PNG images which support transparency, so even the transparent part of your GameObjects would cause a collision since we don't care what is drawn in our GameObject we are just checking the bounds. Next we will be taking a closer look at our image to see if, pixel by pixel, we have collisions.

Wednesday, October 15, 2008

XNA Sidebar - Converting a single index into multiple

I was playing around with some coding ideas and thought about this. Say you have a 5x5 grid defined in a multidimensional array int[5,5] and then you create an array of object that will be placed in that grid. Say you want to refer to those grid entries as 0-24 rather than [0,0][0,1]...[4,3][4,4] a neat way to do it is with a little integer math. Division in integers is whole number division and we use the modulus operator to get remainder. So if we know the width of our grid (in this case 5), we can say

int x = 7;
int wid = 5;
grid[x/wid][x%wid];

would give us

grid[1][2]

which if we line things up

0 1 2 3 4
5 6 7 8 9
10 11 12 13 14
15 16 17 18 19
20 21 22 23 24


we see that the index 7 is the second row, 3rd column, which in 0 based notation is 1,2. You may have already known this, but I thought it was pretty handy.

XNA Part 7 - Audio - Sound Effects

In our last installment, we talked a little about the Song object and how to load a music file and play it in our games. In this post we will talk about the SoundEffect Object. From my understanding the difference between these two types is in a. how they are stored and b. how they are played. Sound effects are considered shorter burts of sound that will be played from beginning to end rather than started, paused, stopped, etc. If there is a XNA genius here who wants to add to the finer details of this, please do so in the comments.

So to add a sound effect to our project, we will add it the same way in our content pipeline. We will add a folder under content called sounds and then add our sound file to that folder.

The difference comes in how we access that file. Rather than exposing that sound file with a Song object, we will load it into a SoundEffect object. So at the top of our class we will add a variable of type SoundEffect called fx.

SoundEffect fx;

Then in our LoadContent method, we will call
fx = Content.Load("sounds\\effect");

Now since this sound effect should be triggered by something happening in our game, we want to play it during our update method.

I am going to add it to the block of code that gets executed when we press the spacebar.

if (ks.IsKeyDown(Keys.Space)) { fx.Play(); }

As you can see we do not use the MediaPlayer class to play a SoundEffect file. They have a built in method to play themselves. Now the Play has 3 versions. the first takes no parameters and just plays the sound at the full volume. The second takes a float for volume control (between 0 and 1) and the 3rd takes a float for volume, a float between -1 and 1 for pitch to move the sound down or up an octave, a float for panning (between -1 left and 1 right, 0 center) and a bool to indicate if the sound should just keep looping.

If we just call fx.Play() it is sort of a set it and forget it sort of deal. It plays, ends and that is it. But if you need additional control over the sound effect after it is started, then you need to save the return value of fx.Play() which is an instance of type SoundEffectInstance. So you would do this.

SoundEffectInstance e = fx.Play(.1f, 0.0f, 0.0f, true);

now the variable e can be used to control this instance of the playing sound effect. It has methods such as Stop, Play, Resume and variables like volume, pan, pitch, islooped, and state (which tells us what the sound is currently doing). That way if you created a SoundEffect as looping, you could stop it with e.Stop();

So now as we move along, you can very easily add sound effects to your games and make them a lot more interesting.

One note, as you progress into 3d games, there are ways to place a sound within 3d space and the SoundEffect objects have methods for dealing with this as well.

Tuesday, October 14, 2008

XNA Part 6 - Audio - Music

Today we will take a slight detour from our drawing of textures to another very important part of games. The audio! Music and sound effects are incredibly important parts of games no matter if you are doing a simple pong game to a massively multiplayer online game.

There are 2 basic type of audio that I want to talk about today. Music and Sound Effects. Now please remember what I am going to talk about today is part of XNA Game Studio 3 beta using Visual C# 2008, not XNA Game Studio 2.

Lets start with music. First, just like with textures, we want to add our music to the content pipeline. Depending on how much music and sound you are adding to your project, you may want to create 2 folders under content. One for Music and one for Sound Effects. So right click on content in the solution explorer and add a new folder and call it music. Then right click on the music folder and 'add'->'existing item' change the type to audio files (you will see that you can load xap,wav,wma and mp3 files) and browse to your music file and add it.

In our code, we will add an instance variable to our Game class to hold a reference to a song object. so somewhere after

public class Game1 : Microsoft.Xna.Framework.Game {

add

Song mySong;

and in the LoadContent method, add the line

mySong = Content.Load("music\\musictrack");

where musictrack is the name of your music file. if you want it to start playing immediately, one the next line put

MediaPlayer.Play(mySong);

and that is it, your song will begin playing at the beginning of the program.

Now your mySong object also exposes some info about your song like
Name,Album, Artist, Duration, Genre, etc if they are available, and the MediaPlayer class has several static methods for Playing, Pausing, Changing Volume, Queuing songs, etc. You can set the volume with

MediaPlayer.Volume = 1.0f;

Or in your update call check for certain keys like we did with movement and change the volume based on key presses.

So next time we will look at the equally easy way to cue up sound effects for your game.

XNA - "Always...no, no...Never...forget to check your references"

There is something to be said for really knowing a topic. To be able to have information at your brain's fingertips at all times makes for quick work. But realistically, there is no way for me (rather than becoming a recluse) that I can have a full grasp of everything in XNA. So that being said, I find that gleaning knowledge from people who are smarter than I is a good use of time. Also, having their work/writings as a quick reference is also very handy. So here is a list of references for XNA that I have checked out so far. (Bonus points if you know what movie my post title came from)

The XNA Creator's Club has a LOT of tutorials and samples and videos to get you started and to keep you going. A lot of the information I am presenting to you is my take on what I have learned from this site so far, as well as these following ones.

Here are some blogs that talk about XNA and some of the advanced things you can do with it. Check them out!

Bad Corporate Logo
http://badcorporatelogo.spaces.live.com/

Cornflower Blue
http://blogs.msdn.com/etayrien/default.aspx

Shaw Hargreaves Blog
http://blogs.msdn.com/shawnhar/default.aspx

Michael Klucher's Blog
http://klucher.com/blog/

Ziggyware
http://www.ziggyware.com

These guys are a lot smarter at XNA than I am for sure, so I'm keeping their blogs on my speed dial for when I need some info! I try my hardest to make my tutorials my own and write them in my own conversational style, but sometimes it may seem like my information is VERY close to information posted by these guys. So please check them out too. If you are an XNA blogger/tutorial writer and you feel I have copied you, my apologies, it probably means I got a lot out of your lesson. Just let me know if you feel that I need to give additional credit to you and (if I was inspired by a post of yours) I will gladly give you credit in my post.

Monday, October 13, 2008

XNA Part 5 - Game Object Class

Up until now we have had our sprite be a simple Texture2D object with its position property as a separate Vector2 object. To simplify our coding, we are going to create another class to handle our in game items. First right click on your "Project" in the solution explorer and click add -> Class. Name this class GameObject. A new class will be created in your project within your namespace. You will however want to replace the block of using statements at the top of your new class file with the ones from the Game1.cs file.

Within the class GameObject we will define our basic class members.

class GameObject
{
Texture2D sprite;
Vector2 position;
float rotation;
Color tint;
}

Each game object will contain a Texture2D to hold its image, a position, a rotation and a tint color.

Now for some basic C#. We need to create a constructor to initialize our object;

public GameObject(Texture2D content)
{
sprint = content;
position = Vector2.Zero;
rotation = 0.0f;
tint = Color.White;
}

Our constructor will take a parameter of type Texture2D and we set sprite to it, and then we initialize our other parameters to good basic values;

Now I will add some properties to let the client code update and access our variables.
public Texture2D Sprite
{
get { return sprite; }
set { sprite = value; }
}
public Vector2 Position
{
get { return position; }
}
public float X
{
get { return position.X; }
set { position.X = value; }
}
public float Y
{
get { return position.Y; }
set { position.Y = value; }
}
public float Rotation
{
get { return rotation; }
set { rotation = value; }
}
public Color Tint
{
get { return tint; }
set { tint = value; }
}

Now back in our game code I remove the alien Texture2D object and the position object. and in it's place add

GameObject alien;

I remove the position setting line from Initialize and the change the loading line in LoadContent to the following

alien = new GameObject(Content.Load("sprites\\alien"));

Which creates a reference to a new gameobject passing it a reference to the Texture2D created by the Content.Load call.

In update, I change my references to alien to the following

if (state.IsKeyDown(Keys.Left)) { alien.X -= 5; }
if (state.IsKeyDown(Keys.Right)){ alien.X += 5; }
if (state.IsKeyDown(Keys.Up)) { alien.Y -= 5; }
if (state.IsKeyDown(Keys.Down)) { alien.Y += 5; }

and my draw call to the following

spriteBatch.Draw(alien.Sprite, alien.Position, alien.Tint);

so now all the parameters in the draw call come from an existing object rather than being hard coded into the draw call.

Just for fun, we will return to the update method and add the following check

if (state.IsKeyDown(Keys.Space)){ alien.Rotation += 0.1f; }

and change our draw call to this overloaded method

spriteBatch.Draw(alien.Sprite,
alien.Position,
null,
alien.Tint,
alien.Rotation,
new Vector2(0,0),
1,
SpriteEffects.None,
0);

Which gives 9 parameters rather than 3.
  • The Texture2D,
  • the position,
  • the null is a placeholder for a parameters we are not using at the moment,
  • the tint,
  • the rotation,
  • the "origin" of the texture or point of rotation/position,
  • the scale of the object (how big to draw it),
  • the spriteeffect (if we want to flip the image)
  • the depth to draw the image
Now when you run your program, if you press the spacebar, your image will rotate.

Here is the code from the game file:


using System;
using System.Collections.Generic;
using Microsoft.Xna.Framework;
using Microsoft.Xna.Framework.Audio;
using Microsoft.Xna.Framework.Content;
using Microsoft.Xna.Framework.GamerServices;
using Microsoft.Xna.Framework.Graphics;
using Microsoft.Xna.Framework.Input;
using Microsoft.Xna.Framework.Net;
using Microsoft.Xna.Framework.Storage;

namespace TutorialGame
{
public class Game1 : Microsoft.Xna.Framework.Game
{
GraphicsDeviceManager graphics;
SpriteBatch spriteBatch;

GameObject alien;

public Game1()
{
graphics = new GraphicsDeviceManager(this);
Content.RootDirectory = "Content";
}

protected override void Initialize()
{

base.Initialize();
}

protected override void LoadContent()
{
spriteBatch = new SpriteBatch(GraphicsDevice);
alien = new GameObject(Content.Load
("sprites\\alien"));
}
protected override void UnloadContent()
{
}
protected override void Update(GameTime gameTime)
{
if (GamePad.GetState(PlayerIndex.One).Buttons.Back == ButtonState.Pressed)
this.Exit();

KeyboardState state = Keyboard.GetState();

if (state.IsKeyDown(Keys.Left)) { alien.X -= 5; }
if (state.IsKeyDown(Keys.Right)){ alien.X += 5; }
if (state.IsKeyDown(Keys.Up)) { alien.Y -= 5; }
if (state.IsKeyDown(Keys.Down)) { alien.Y += 5; }
if (state.IsKeyDown(Keys.Space)){ alien.Rotation += 0.1f; }

base.Update(gameTime);
}

protected override void Draw(GameTime gameTime)
{
graphics.GraphicsDevice.Clear(Color.CornflowerBlue);
spriteBatch.Begin();
spriteBatch.Draw(alien.Sprite,
alien.Position,
null,
alien.Tint,
alien.Rotation,
new Vector2(0,0),
1,
SpriteEffects.None,
0);
spriteBatch.End();
base.Draw(gameTime);
}
}
}


and the code from the GameObject File (I've made it a little bigger this time):

using System;
using System.Collections.Generic;
using Microsoft.Xna.Framework;
using Microsoft.Xna.Framework.Audio;
using Microsoft.Xna.Framework.Content;
using Microsoft.Xna.Framework.GamerServices;
using Microsoft.Xna.Framework.Graphics;
using Microsoft.Xna.Framework.Input;
using Microsoft.Xna.Framework.Net;
using Microsoft.Xna.Framework.Storage;

namespace TutorialGame
{
class GameObject
{
Texture2D sprite;
Vector2 position;
float rotation;
Color tint;

public GameObject(Texture2D content)
{
sprite = content;
position = Vector2.Zero;
rotation = 0.0f;
tint = Color.White;
}

public Texture2D Sprite
{
get { return sprite; }
set { sprite = value; }
}
public Vector2 Position
{
get { return position; }
}
public float X
{
get { return position.X; }
set { position.X = value; }
}
public float Y
{
get { return position.Y; }
set { position.Y = value; }
}
public float Rotation
{
get { return rotation; }
set { rotation = value; }
}
public Color Tint
{
get { return tint; }
set { tint = value; }
}

}
}

Friday, October 10, 2008

XNA Part 4 - Controls

Now that we have drawn a texture on the screen and made it move on a sine wave, lets make it move in response to our input.

There are 3 basic input devices that you can access. The Keyboard, The Mouse and a Gamepad. The wired XBox 360 controller is USB, so you can plug one straight into your computer. But alas I do not have one (unless someone has one they want to send me), so I'll only mention it here a little bit, if you are writing games for XBox360, you will need to program with it in mind. I'm going to focus on the keyboard, since it ubiquitous on PCs.

We access the keyboard during the update method and look at the keyboard 'state'

KeyboardState state = Keyboard.GetState();

now the object state will contain information about the keyboard at that particular time slice. We can look at that object and based on information in it, make updates to our game. We will pass 4 different keys to the "IsKeyDown" method of the state object which returns true if the key we pass it is indeed pressed at that moment. We pass the IsKeyDown method a variable from the "Keys" enumeration which contains a list of all the keys that we could be pressing. Here is the code for checking and updating.

if (state.IsKeyDown(Keys.Left)) { position.X -= 5; }
if (state.IsKeyDown(Keys.Right)) { position.X += 5; }
if (state.IsKeyDown(Keys.Up)) { position.Y -= 5; }
if (state.IsKeyDown(Keys.Down)) { position.Y += 5; }

So we check each of the 4 keys and update the position accordingly.

Now if we compile and run our game, our arrow keys will move our texture.

To access gamepad information we would do this

GamePadState pad = GamePad.GetState(PlayerIndex.One);
position.X += pad.ThumbSticks.Right.X * 5.0f;
position.Y += pad.ThumbSticks.Right.Y * 5.0f;

pad is a GamePadState object that we get from GamePad.GetState and we give it the player index (One through Four). Then we get the value of the Right thumbstick (which goes from -1 to 1) and use that as a multiplier for the addition to our position. That way the further we press the thumbstick the faster it will move! We do not have that degree of control on a keyboard.

Here is the code:

using System;
using System.Collections.Generic;
using Microsoft.Xna.Framework;
using Microsoft.Xna.Framework.Audio;
using Microsoft.Xna.Framework.Content;
using Microsoft.Xna.Framework.GamerServices;
using Microsoft.Xna.Framework.Graphics;
using Microsoft.Xna.Framework.Input;
using Microsoft.Xna.Framework.Net;
using Microsoft.Xna.Framework.Storage;

namespace TutorialGame
{
public class Game1 : Microsoft.Xna.Framework.Game
{
GraphicsDeviceManager graphics;
SpriteBatch spriteBatch;
Texture2D alien;
Vector2 position = Vector2.Zero;

public Game1()
{
graphics = new GraphicsDeviceManager(this);
Content.RootDirectory = "Content";
}

protected override void Initialize()
{
position.Y = graphics.GraphicsDevice.Viewport.Height / 2;
base.Initialize();
}

protected override void LoadContent()
{
spriteBatch = new SpriteBatch(GraphicsDevice);
alien = Content.Load
("sprites\\alien");
}
protected override void UnloadContent()
{
}
protected override void Update(GameTime gameTime)
{
if (GamePad.GetState(PlayerIndex.One).Buttons.Back == ButtonState.Pressed)
this.Exit();

KeyboardState state = Keyboard.GetState();

if (state.IsKeyDown(Keys.Left)) { position.X -= 5; }
if (state.IsKeyDown(Keys.Right)) { position.X += 5; }
if (state.IsKeyDown(Keys.Up)) { position.Y -= 5; }
if (state.IsKeyDown(Keys.Down)) { position.Y += 5; }

base.Update(gameTime);
}

protected override void Draw(GameTime gameTime)
{
graphics.GraphicsDevice.Clear(Color.CornflowerBlue);
spriteBatch.Begin();
spriteBatch.Draw(alien, position, Color.White);
spriteBatch.End();
base.Draw(gameTime);
}
}
}

Wednesday, October 08, 2008

XNA - A slight adjustment

In researching audio methods for XNA I have discovered that XNA 3.0 has better (and easier) tools for dealing with audio. So before I get into anything that will be made obsolete when XNA 3 comes out of beta, I am upgrading to 3.0 beta now. Everything so far should be uneffected by this change. Just to let you know that is the platform I am now using. In addition, XNA 3.0 required C#2008 so I upgraded that too.