I have been reading Steering Behaviors For Autonomous Characters by Craig Reynolds and after several reads I have decided to try to implement it in my own code and I think I am ready to explain it to you my loyal reader.
In his paper Mr Reynolds take a different approach that we have been taking thus far. Rather than having our steering be a simple rotation and moving forward at a set speed. He takes several other aspects into consideration, making a much more detailed simulation. To start we think about it in these terms: First we decide what direction and "magnitude" we need to move in that direction to steer us toward our goal. This is called our "Steering Vector". If we applied the steering vector all at once, we would immediately be put on the right path, but that would make for a very non-realistic simulation. Instead, rather, in the application of the steering vector, we take into consideration our current velocity, direction, mass and maximum force we can exert. We then factor these items against our steering vector to get an acceleration in a new direction to be added to our current velocity, we truncate this new velocity to our maximum speed and in that timestep we take a step towards steering to our goal.
The benefit of this method really lies in the Steering Vector. Since vectors can be scaled, added, subtracted, etc. We could apply several steering vectors. Say an object was following waypoints, we could say if an enemy is within a given distance, add the Flee steering vector times 50% and the Waypoint vector times 50%. We would then apply this new steering vector rather than just Waypoint or Flee, so that the object is still trying to do the waypoints, while evading.
In my next post, I will start looking at how we can adapt this method into our GameObject class.
The paper to which I am referring.

A husband, a father of 7, a runner training for 2 marathons this year as a Hammer Nutrition sponsored athlete,a guitar player,a digital artist and a computer programmer by day. I got this.
Showing posts with label Math. Show all posts
Showing posts with label Math. Show all posts
Monday, November 03, 2008


Wednesday, October 29, 2008
XNA Sidebar - More Vectors
Another thing that vectors can do for us is handle acceleration. We already talked about moving at a certain velocity (distance and direction) but what happens if we want to continue on that path or speed up or turn in a new direction. We have to accelerate or slow down or have force applied to us in a new direction. If our object has a position P and a current velocity of [3,3] which means at every timestep we move 3 in the x direction and 3 in the y direction. If we want to speed up to [10,10] we could of course just set our velocity to [10,10], but that is very unrealistic. That would be like getting in your car and going 30 miles per hour, pressing the gas and in one microsecond be going 100 mph! The sheer force of that acceleration alone would probably kill you. Depending on your mode of transportation you have limits to how fast you can accelerate. This is defined by how much mass you have and how much force you can exert. Because if you took high-school physics, you may remember this.
F=ma
Which means: Force = Mass x Acceleration. This is Newton's Second Law of Motion. We would know the mass of our object ( say your vehicle weighs ton in english measurements. Which is approx 907kg) and we decide it should be able to go from 0 to 30 meters per second (which is about 60 miles per hour, use google to do your conversions!) in 10 seconds. Now we will assume for our simulation that acceleration is constant, that means every second we would need to go 3 meters per second faster. So we want to acellerate at a maximum of 3 m/s^2. So our maximum force is
907kg * 3 m/s^2 = 2721 Newtons or (kg*m/s^2)
But how do we apply this to vectors?
Well first we need to know our desired velocity. In my car example before we were going 30 mph and our desired velocity was 100mph (naughty speeder) That is velocity in 1 direction. Now lets think in 2. our current velocity is the vector [0,0] and we want to go [10,10] we cannot just jump from one to the other. In this case we can actually use the length of the vector to represent the force we would have to apply to go from one to the other. In this case the length of the vector is 14.14 well, say we determine that our maximum force is a vector length of 2, we truncate our desired vector to a length of 2 (we leave it alone if it is less than that already) and that gives us a vector which is the maximum force vector which we can apply to our object. So now that we have force, we divide that by the mass of our object say 10kg and that gives us our acceleration vector. Now for each timestep we do this calculation and add our acceleration vector to our current velocity to get our new accelerated velocity. We do have to truncate our velocity to our maximum speed since the length of our velocity vector is equal to our speed. Then we simply add our velocity vector to our position point and we have our new position for that timestep.
So some things we learned about vector lengths...
Length of the Vector between 2 velocity vectors is the total force required to accelerate from one to the other.
Then length of the velocity vector is the current speed
The Acceleration vector is gained by Dividing the Force vector by the mass of the object
The Acceleration vector is added to the velocity vector each time step to gain a new velocity.
Did I get something wrong? If you know more about this than me, please contribute by commenting below!
F=ma
Which means: Force = Mass x Acceleration. This is Newton's Second Law of Motion. We would know the mass of our object ( say your vehicle weighs ton in english measurements. Which is approx 907kg) and we decide it should be able to go from 0 to 30 meters per second (which is about 60 miles per hour, use google to do your conversions!) in 10 seconds. Now we will assume for our simulation that acceleration is constant, that means every second we would need to go 3 meters per second faster. So we want to acellerate at a maximum of 3 m/s^2. So our maximum force is
907kg * 3 m/s^2 = 2721 Newtons or (kg*m/s^2)
But how do we apply this to vectors?
Well first we need to know our desired velocity. In my car example before we were going 30 mph and our desired velocity was 100mph (naughty speeder) That is velocity in 1 direction. Now lets think in 2. our current velocity is the vector [0,0] and we want to go [10,10] we cannot just jump from one to the other. In this case we can actually use the length of the vector to represent the force we would have to apply to go from one to the other. In this case the length of the vector is 14.14 well, say we determine that our maximum force is a vector length of 2, we truncate our desired vector to a length of 2 (we leave it alone if it is less than that already) and that gives us a vector which is the maximum force vector which we can apply to our object. So now that we have force, we divide that by the mass of our object say 10kg and that gives us our acceleration vector. Now for each timestep we do this calculation and add our acceleration vector to our current velocity to get our new accelerated velocity. We do have to truncate our velocity to our maximum speed since the length of our velocity vector is equal to our speed. Then we simply add our velocity vector to our position point and we have our new position for that timestep.
So some things we learned about vector lengths...
Length of the Vector between 2 velocity vectors is the total force required to accelerate from one to the other.
Then length of the velocity vector is the current speed
The Acceleration vector is gained by Dividing the Force vector by the mass of the object
The Acceleration vector is added to the velocity vector each time step to gain a new velocity.
Did I get something wrong? If you know more about this than me, please contribute by commenting below!
Tuesday, October 28, 2008
XNA Sidebar - Intro To Vector Math
 I am not a math wiz, but I know enough to get around. I wrote my Sidebar article on Trigonometry to explain a few concepts that people might want to know to better program in XNA. Well according to my site metrics, it quicky became one of my most viewed pages. So apparently it was info people wanted to know! Well in that same spirit, I give you my intro to vectors post.
Vectors in 2 dimensions are relatively easy concepts, especially when you can visualize them. They have 2 parts, a direction and a magnitude. We can write them as a simple coordinate like [7,8]. Now, although this looks more like a point (and you are right) if we consider this as relative to another point, say (0,0) we now have a vector. As you can see the vector in the image has a direction and a length. In this case the length could be found by the Pythagorean theorem. where A is the x length and B is the Y length. So the length of this vector is the square root of 7 squared + 8 squared, which is 10.63.
One of the simplest operations we can do to a vector is addition. Say we take our vector [7,8] and add [1,3]. If we look at example B, we see the 2 vectors. But when we add them, we simply add their 2 components. Thus resulting in a new vector [8,11]. Which makes more sense if we look at example C where we have stacked the first
 2 vectors. That is went from the endpoint of the first vector and moved 1 in the x direction and 3 in the Y. The same goes for subtraction, just minus instead of plus
Multiplication is another useful tool for Vectors. when we multiply a vector times a scaler (a single number) it "scales" the vector to a new length. So if we say [3,4] * 2 we end up with the vector [6,8] which is 2 times as long as the first vector. See Example D. Want some proof? The length of the vector [3,4]
LENGTH [3,4]
= SQRT[3^2 + 4^2]
= SQRT[9+16]
= SQRT[25]
= 5
[3,4] * 2 = [6,8]
LENGTH [6,8]
= SQRT[6^2 + 8^2]
= SQRT[36 + 64]
= SQRT[100]
= 10
and 10 is 2 times 5.
So we have double the length of the vector, but kept the same direction. Much like if we think of a vector as a force being applied to an object in a given direction it will go a certain distance. If we double that force, it will go twice as far. This works the same for division. dividing a vector by 2 will cut it's length in half.
One of the things that we may want to do is find out what the vector that goes in the same direction as this vector, but has a length of 1 is. This is called a unit vector and is gained when we normalize a vector. Luckily for us the XNA Vector2 class has a Normalize method which converts a Vector2 into a unit vector. This is really handy when we have a vector that we want to follow, but it is longer than our current velocity can carry us. Say we want to move from (0,0) to (5,5) we would add the vector (5,5) to position, but say our maximum speed for that movement is only 2. The vector [5,5] would take us aprx 7.07 in that direction. We need to find the vector that is 2 units long in the same direction. We can do that by Normalizing the vector [5,5] and then multiplying it by 2. So we scale it up or down to a length of 1 and then multiply it by the length we actually want it to be. So in c# that would look like this
float maxSpeed = 2;
Vector2 canGo;
Vector2 wantToGo = new Vector2(5,5);
wantToGo.Normalize();
canGo = wantToGo * maxSpeed;
When we multiply this out we get a point that is at [1.14,1.14] This is the vector [5,5] Normalized and multiplied by 2. You are going to see these vector method a lot in our new steering code, because a lot of the time we want to steer further than we are able to move so we have to scale back our vector to a size that we can actually move.
Thursday, October 23, 2008
XNA Sidebar - Trigonometry
One area that you may find yourself lacking is in the area of math. Especially when it comes to trig. In this post I want to talk a little about trig and how we can use it in our game programming.
First of it is very good to understand the concept of radians. The trig functions that you will be using in XNA deal with radians, and while you can convert radians to degrees, it is easier to just understand them.
We are used to the idea that a circle is 360 degrees, in radians that is equal to 2π. So all the way around the circle is equal to 0 to apx 6.28 radians, or 0 to 2π radians. Once you go past 2π, you are going around the circle again and can start measuring again. There is a helper function in the MathHelper class called WrapAngle(float angle) that takes a radian measurement and constrains it to -π to π (that is 2π total). So if your Radian Measurment was 3π, it would return a value of π since those 2 angles are equivelent.
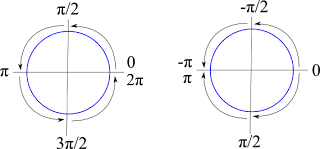
So as you can see from this image, we can look at either making a full circuit around the circle from 0 to 2π or going half a circle π in either direction.
This way we can spin like this in our code and stay within these bounds.
and although it looks like rotation would end up at 100, it actually ends up at -0.5309677 since the WrapAngle maps its value into the -π to π space.
The next question to deal with is this: I am pointing in a given direction and want to move forward 10. How do I determine how much I want to move in the X and Y directions to let me move 10 along my current path. The answer lies in Sin and Cos. If we take a right triangle we can discover the length of a side or an angle if we know 2 of the others. So in this case, we are pointing along the hyp and want to move 10 in that direction. So we want to find the length of the opposite side and the adjacent side. We do this in 2 steps. 1st to find the opposite side (which will be the Y value we add to our current location, we use the Sine function.
Sin(angle) = opposite / hypotenuse
We know the angle from our object's current rotation and we know we want the hyp to be 10 we get this
Sin(rotation) = Y / 10
and if we multiply both sides by 10 we get
10Sin(rotation) = Y
So our Y coordinate for the addition to our current position is 10 times the Sine of our rotation. To get the X coordinate, we do the exact same thing except use the Cosine function. Since
Cos(angle) = adjacent/hyp
In C# it looks like this...
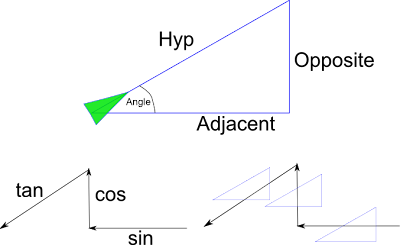
Now how do you remember which is which? Well if you take the image above with the 3 arrows, left arrow, up arrow, down-left arrow and think sin,cos,tan if we superimpose these arrows over 3 triangles you will see that the arrow shows you what order to put the sides in. The left pointing arrow goes over the opposite then the hyp, that is sine. The up arrow goes over adjacent then hyp, that is cosine, the the left-down arrow goes over opposite to adjacent that is tangent.
Now if you already know the 2 sides and need to find the angle instead, you can use the "Arc" versions of sine, cosine and tangent. They look like this
angle = arcsine(opposite/hyp)
angle = arccosine(adjacent/hyp)
angle = arctangent(opposite/adjacent)
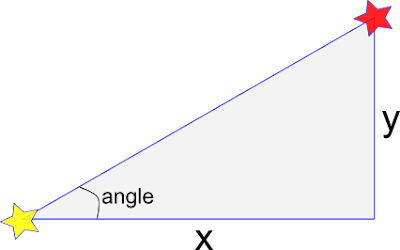
this last one ArcTangent is very helpful if we need to determine at what angle one object is to another. If you look at the example below, if we know the x and y distance from the yellow star to the red star, we can take the arctangent of y/x to get the angle in radians. The 'arc' functions are found in the Math library as Atan, Asin and Acos
So this is a little crash course in Trig. Did it answer your questions? Are there other things you would like me to cover? Let me know, talk back below!
First of it is very good to understand the concept of radians. The trig functions that you will be using in XNA deal with radians, and while you can convert radians to degrees, it is easier to just understand them.
We are used to the idea that a circle is 360 degrees, in radians that is equal to 2π. So all the way around the circle is equal to 0 to apx 6.28 radians, or 0 to 2π radians. Once you go past 2π, you are going around the circle again and can start measuring again. There is a helper function in the MathHelper class called WrapAngle(float angle) that takes a radian measurement and constrains it to -π to π (that is 2π total). So if your Radian Measurment was 3π, it would return a value of π since those 2 angles are equivelent.

So as you can see from this image, we can look at either making a full circuit around the circle from 0 to 2π or going half a circle π in either direction.
This way we can spin like this in our code and stay within these bounds.
for(int i = 0; i< 1000;i++){
rotation = MathHelper.WrapAngle(rotation + 0.1f);
}
and although it looks like rotation would end up at 100, it actually ends up at -0.5309677 since the WrapAngle maps its value into the -π to π space.
The next question to deal with is this: I am pointing in a given direction and want to move forward 10. How do I determine how much I want to move in the X and Y directions to let me move 10 along my current path. The answer lies in Sin and Cos. If we take a right triangle we can discover the length of a side or an angle if we know 2 of the others. So in this case, we are pointing along the hyp and want to move 10 in that direction. So we want to find the length of the opposite side and the adjacent side. We do this in 2 steps. 1st to find the opposite side (which will be the Y value we add to our current location, we use the Sine function.
Sin(angle) = opposite / hypotenuse
We know the angle from our object's current rotation and we know we want the hyp to be 10 we get this
Sin(rotation) = Y / 10
and if we multiply both sides by 10 we get
10Sin(rotation) = Y
So our Y coordinate for the addition to our current position is 10 times the Sine of our rotation. To get the X coordinate, we do the exact same thing except use the Cosine function. Since
Cos(angle) = adjacent/hyp
In C# it looks like this...
float moveDist = 10;
Vector2D movement = new Vector2D();
movement.Y = moveDist * Math.Sin(rotation);
movement.X = moveDist * Math.Cos(rotation);

Now how do you remember which is which? Well if you take the image above with the 3 arrows, left arrow, up arrow, down-left arrow and think sin,cos,tan if we superimpose these arrows over 3 triangles you will see that the arrow shows you what order to put the sides in. The left pointing arrow goes over the opposite then the hyp, that is sine. The up arrow goes over adjacent then hyp, that is cosine, the the left-down arrow goes over opposite to adjacent that is tangent.
Now if you already know the 2 sides and need to find the angle instead, you can use the "Arc" versions of sine, cosine and tangent. They look like this
angle = arcsine(opposite/hyp)
angle = arccosine(adjacent/hyp)
angle = arctangent(opposite/adjacent)
this last one ArcTangent is very helpful if we need to determine at what angle one object is to another. If you look at the example below, if we know the x and y distance from the yellow star to the red star, we can take the arctangent of y/x to get the angle in radians. The 'arc' functions are found in the Math library as Atan, Asin and Acos

So this is a little crash course in Trig. Did it answer your questions? Are there other things you would like me to cover? Let me know, talk back below!
Sunday, October 19, 2008
XNA Sidebar - SmoothStep and Lerp
Here is another bit of information for you when you are coding. There is a small class called MathHelper that you should become familiar with. It is in the Microsoft.Xna.Framework namespace. It contains 11 methods and 7 fields. The fields are 3 values of E (E, Log2E, Log10E) and 4 versions of Pi (Pi, Pi/2, Pi/4 and 2Pi) , but the things we want to talk in this post I want to
mention 2 methods in the class.
 Lerp and SmoothStep are 2 methods in the MathHelper class that can assist us when trying to change from one value to another. If an object is going at one speed and needs to slow down to another there should be be a smooth transition between the 2 speeds. Or perhaps something needs to change from one value to another at a constant rate. These are the functions for you.
Lerp is short for Linear Interpolation, it makes a straight line between 2 values that you provide and gives you the value on that line at the percentage you pass it. It is the red line in the graphic.
The second method is SmoothStep, you invoke it the same way as Lerp, by passing a low, high and percent (0.0-1.0) value. The difference is in the value it returns. As it's name implies, the value steps down smoothly from the first value to the second using a cubic function. It's example is the blue line in the graphic.
So the next time you need to go between 2 values and you can determine how far into the transition you are, you can use one of these 2 methods to make a better transition.
mention 2 methods in the class.
 Lerp and SmoothStep are 2 methods in the MathHelper class that can assist us when trying to change from one value to another. If an object is going at one speed and needs to slow down to another there should be be a smooth transition between the 2 speeds. Or perhaps something needs to change from one value to another at a constant rate. These are the functions for you.
Lerp is short for Linear Interpolation, it makes a straight line between 2 values that you provide and gives you the value on that line at the percentage you pass it. It is the red line in the graphic.
Lerp(LowValue,HighValue,Percentage);
The second method is SmoothStep, you invoke it the same way as Lerp, by passing a low, high and percent (0.0-1.0) value. The difference is in the value it returns. As it's name implies, the value steps down smoothly from the first value to the second using a cubic function. It's example is the blue line in the graphic.
SmoothStep(LowValue,HighValue,Percentage);
So the next time you need to go between 2 values and you can determine how far into the transition you are, you can use one of these 2 methods to make a better transition.
EDIT
If you are interested in the code that I generated this example from, it is not in XNA (although it does reference the Microsoft.XNA.Framework assembly to get the Lerp and SmoothStep methods. Here is the file
LerpandSmoothStep.zip
Subscribe to:
Posts (Atom)